Mastering E-Commerce Backend Development with Django: User Registration

I am a software developer with specialization on backend development.
Hello developer! In the last two posts in this series, we looked into the series introduction and setting up our project. In this post, we now start with the e-commerce authentication system. But first, what's authentication?

Authentication systems serve as the gatekeepers of digital realms, verifying that users are indeed who they claim to be. Think of logging into platforms like Facebook or X (Formally Twitter). You input your email and password, seemingly simple steps, but what unfolds behind the scenes is a complex security dance. These platforms validate your credentials by cross-referencing them with their databases.
When authentication succeeds, you gain access to a world of content—be it your Facebook feed or an X timeline. But if the check fails, you're greeted with a familiar yet frustrating alert: "Incorrect email or password." It's a message most of us have encountered at some point, a stark reminder of the intricacies involved in keeping our digital lives secure.
In this post, we will build a system to register users, log users in, and log users out. Yes with our promise, we will be using Test Driven Development approach in our development.
Let's proceed by first planning out the data we would like to collect from our users when they sign up and log in.

Registration
We expect a user on the app, a user who comes to purchase products on the platform. The necessary fields I can think of are
email, password, username, first_name, last_name, phone_number, address, verified, created_from, updated_at, created_at, terms_nd_condition, image
With the vision in mind, it's time to mold this into reality. Recall the Django project we spun up in our last post? With your magical environment still active, let's write some tests to mimic a user registering on the platform, the tests will fail and we will write code to pass the tests. First, let's create the account app.
# Ensure you are in the project working directory that has manage.py file
python manage.py startapp account
With the account app created, our next expedition leads us to the tests.py file nested within. Here we shall put our test cases. Put the code below in the file
import pytest
from django.urls import reverse
from rest_framework.test import APIClient


@pytest.fixture
def api_client(db):
    return APIClient()


@pytest.fixture
def sample_user_data(db):
    return {'email': 'tut@mail.com', 'password': "tutad1234"}


def test_registration_pass(api_client, sample_user_data):
    sample_user_data.update({'confirm_password': sample_user_data['password']})
    registration_url = reverse('register')
    response = api_client.post(registration_url, data=sample_user_data)
    assert response.status_code == 201
    assert not Account.objects.get(email=sample_user_data['email']).verified
Okay, let's go through the code above
Starting with a couple of imports pytest - our chosen package for testing, reverse - for dynamically generating full path URL from URL namespace, APIClient - for making those API calls to test the endpoints.
Why Pytest?
pytest is a powerful and flexible testing framework for Python. It simplifies the process of writing small tests, yet scales to support complex functional testing. Here are some reasons why it's favored in this context:
Simplicity: Pytest's use of simple
assertstatements make tests readable and easy to write.Fixtures: The fixture system in
pytestis a highlight, allowing you to define test data and states that can be reused across multiple tests.Parameterization: Pytest supports parameterizing tests, which means running the same test function with different data inputs.
Plugins: There's a rich ecosystem of plugins for integrating with other tools and expanding testing capabilities.
Two fixtures are defined
api_client: This fixture is a function that returns an instance ofAPIClient. Thedbargument passed to the function signals topytestto ensure a database is available for the tests. Thisapi_clientwill be used to make HTTP requests in the tests.sample_user_data: This fixture provides a dictionary representing a sample user's data. This data is used to simulate a user's registration data that might be sent to your API.
The actual test function test_registration_pass does the following:
The function is marked with
api_clientandsample_user_datafixtures as arguments, which meanspytestwill inject the values returned by these fixtures into the test.It uses the
reversefunction to get the URL for the registration endpoint, which is presumably named 'register' in your Django URL configuration.It then uses the
api_clientto send a POST request to the registration URL with thesample_user_dataas the payload.Finally, the test asserts that the status code of the response is 201, which means "Created." This assertion checks if a new user is successfully registered, as HTTP 201 is the expected status code for a successful resource creation on the server.
Before we run our test, let's point pytest to our Django settings file by creating a pytest.ini file and adding the lines below
[pytest]
DJANGO_SETTINGS_MODULE = ecoms.settings
python_files = tests.py test_*.py *_tests.py
and it's time to install pytest-django and add to the list of requirements. pytest-django is a plugin for pytest that provides a set of useful tools for testing Django applications. It makes it easier to write tests by providing Django-specific features and fixtures. some of the key reasons why we use pytest-django
Django Integration:
pytest-djangoconfigurespytestto use Django's test settings. This means that when you run your tests,pytestknows how to set up your Django environment without any extra work on your part.Database Fixtures: The plugin provides built-in fixtures for database access which handle setup and teardown of the test database, allowing you to test code that requires database access without any extra configuration.
Admin Client:
pytest-djangoincludes a fixture for Django’sAdminClient, making it straightforward to write tests that require an authenticated admin user.Mail Outbox: It provides access to Django’s mail-outbox for tests that involve sending emails. You can check that emails are sent correctly and inspect their content within your tests.
Compatibility:
pytest-djangomakes it possible to leverage all the features ofpytest, including parametrization, plugins, and its powerful assertion rewriting system, in the context of a Django project.
pip install pytest-django && pip freeze > requirements.txt
Now to run the test, with the virtual environment activated run the command below
$ pytest account
you should be presented with an error
FAILED account/tests.py::test_registration_pass -django.urls.exceptions.NoReverseMatch: Reverse for 'register' not found. 'r...
To make this test a success, we will need to create our account model, create the registration URL, and create the business logic to store the user's data in the database. Our next expedition leads us to the models.py script nestled within. Here, we shall sculpt the very essence of our Account model.
Update the file with the code below
from django.db import models
from django.contrib.auth.models import AbstractUser

class Account(AbstractUser):
    username = models.CharField(max_length=200, blank=True)
    email = models.EmailField(max_length=300, unique=True)
    verified = models.BooleanField(default=False)
    phone_number = models.CharField(max_length=20, blank=True)
    address = models.TextField(blank=True)
    image = models.ImageField(upload_to='account/profile', blank=True)
    created_from = models.CharField(max_length=15)
    term_and_condition = models.BooleanField(default=False)
    updated_at = models.DateField(auto_now=True)

    USERNAME_FIELD = 'email' # this will be used to log in users instead of username
    REQUIRED_FIELDS = ['username'] # this is for admin when creating superuser
But some fields are missing you asked? No, they are not, We have inherited some fields and methods from Django's built-in AbstractUser, these fields include first_name, last_name, password etc.
It's time to create the registration URL, first, create urls.py file in the account app directory. This file will store all the URLs for our account app and add the lines below
from django.urls import path
from . import views

urlpatterns = [
    path("register/", views.RegistrationView, name="register"),
]
and ensure you let Django know about this new urls.py file by going into the urls.py file in the project folder i.e the folder that has settings.py file and update with the lines
from django.urls import path, include

urlpatterns = [
    # ... other urls
    path('account/', include('account.urls'))
]
Now to the registration business logic, proceed to views.py in the account folder and add the code below
from rest_framework.decorators import api_view, permission_classes
from rest_framework.permissions import AllowAny
from rest_framework.response import Response
from rest_framework import status
from django.db import transaction
from .serializer import RegistrationSerializer

@api_view(["POST"])
@permission_classes([AllowAny])
def RegistrationView(request) -> Response:
    with transaction.atomic():
        try:
            serializer = RegistrationSerializer(data=request.data)
            serializer.is_valid(raise_exception=True)
            serializer.save()
            return Response(serializer.data, status=status.HTTP_201_CREATED)
        except Exception as e:
            transaction.set_rollback(True)
            return Response(
                serializer.errors,
                status.HTTP_400_BAD_REQUEST,
            )
since we are importing from serializer.py, let's create it in the account folder and add the code below
# serializer.py file
from rest_framework import serializers
from .models import Account
from .utils import validate_passwords


class RegistrationSerializer(serializers.ModelSerializer):
    confirm_password = serializers.CharField(write_only=True)
    password = serializers.CharField(write_only=True)

    class Meta:
        model = Account
        fields = ["email","username","password","confirm_password",
            "term_and_condition","address"]

    def validate(self, data):
        password = data.get("password")
        confirm_password = data.get("confirm_password")
        validate_passwords(password, confirm_password)
        del data["confirm_password"]
        return data
and yes you guessed right, we will need to create a utils.py file in the account folder where we have a function to validate the user's password
# utils.py
from rest_framework import serializers

def validate_passwords(password, confirm_password) -> None:
    if len(password) < 8:
        raise serializers.ValidationError(
            {
                "password": "This password is too short. It must contain at least 8 characters."
            }
        )
    if password.isalpha() or password.isnumeric():
        raise serializers.ValidationError({"password": "password must be alphanumeric"})
    if confirm_password != password:
        raise serializers.ValidationError(
            {"confirm_password": "passwords do not match"}
        )
One last thing here, let's let Django know about our app and new user model to use instead of the built-in user model
Update the installed apps list in the settings.py file and add AUTH_USER_MODEL to the end of the file
INSTALLED_APPS = [
    "django.contrib.admin",
    "django.contrib.auth",
    "django.contrib.contenttypes",
    "django.contrib.sessions",
    "django.contrib.messages",
    "django.contrib.staticfiles",

    # local apps
    "account",
]

# tells Django to use account model instead of User built-in model
AUTH_USER_MODEL = 'account.account'
Let's take our environment to the docker environment, but first, we will need to rebuild our containers
docker-compose up --build -d
and points our Django project to use the Postgres db container
import os
from dotenv import load_dotenv
load_dotenv()
# Database
# https://docs.djangoproject.com/en/4.2/ref/settings/#databases

DATABASES = {
    "default": {
        "ENGINE": "django.db.backends.postgresql",
        "NAME": os.getenv("DB_NAME"),  # database name
        "USER": os.getenv("DB_USER"),  # database user_name
        "PASSWORD": os.getenv("DB_PASSWORD"),  # the password you set for the PostgreSQL user
        "HOST": "db",  # set to the address of your PostgreSQL if not on the same machine
        "PORT": "5432",  #
    }
}
Don't forget to sync the model with the database
docker-compose exec -it web bash -c "python manage.py makemigrations && python manage.py migrate"
Yeah let's now our test to ensure it passes now
docker-compose exec -it web bash -c pytest account

Well done, we can now scale out our registration test to test for different cases. update account/tests.py
@pytest.mark.parametrize(
    "email, password, confirm_password, expected_status, expected_error_key, expected_message",
    [
        (
            "not-an-email","Password123","Password123",
            status.HTTP_400_BAD_REQUEST,"email","Enter a valid email address.",
        ),
        (
            "existing@email.com","Password123","Password123",
            status.HTTP_400_BAD_REQUEST,"email","user with this email already exists.",
        ),
        (
            "valid@email.com","short","short",
            status.HTTP_400_BAD_REQUEST,"password","This password is too short. It must contain at least 8 characters.",
        ),
        (
            "valid@email.com","NoNumbers","NoNumbers",
            status.HTTP_400_BAD_REQUEST,"password","password must be alphanumeric",
        ),
        (
            "valid@email.com","NoNumbers5","NoNumbers3",
            status.HTTP_400_BAD_REQUEST,"confirm_password","passwords do not match",
        ),
    ],
)
def test_resister_user_fail(api_client,create_sample_user, sample_user_data,email,password,confirm_password,expected_status,expected_error_key,expected_message):
    register_url = reverse("register")  # get the registration URL
    if email == "existing@email.com":
        # create an existing user
        create_sample_user(
            email="existing@email.com",
            password="Password123",
        )
    sample_user_data.update(
        {"email": email, "password": password, "confirm_password": confirm_password}
    )
    response = api_client.post(register_url, data=sample_user_data)
    assert response.status_code == expected_status  # confirm status code
    assert (
        expected_message in response.json()[expected_error_key]
    )  # confirm error message
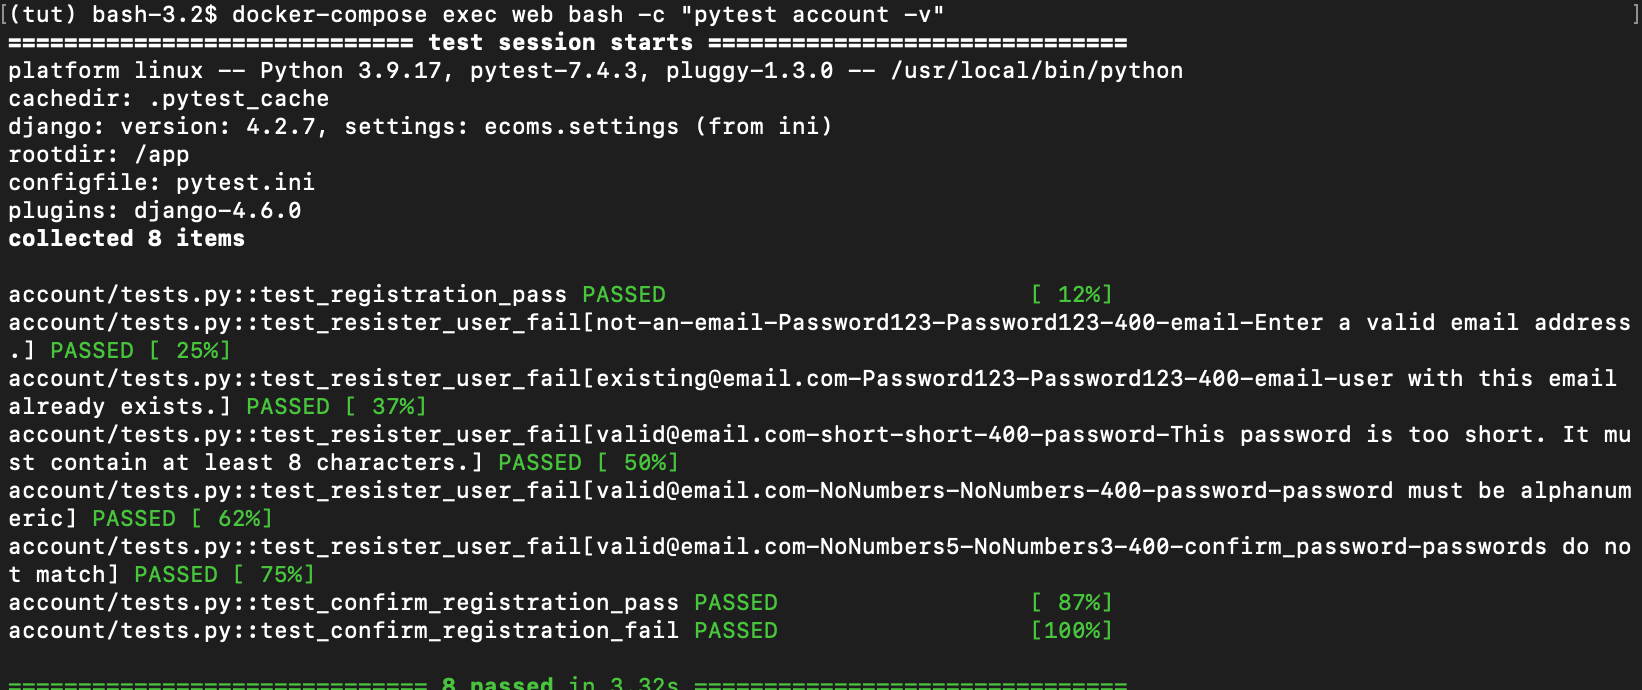
Run the tests again but with the -v flag i.e. in verbose mode
docker-compose exec -it web bash -c pytest account

Please take a coffee break, tests are green !!!

Sending a Welcome Email with an Email Verification Link
Engaging with your users from the moment they sign up is crucial for maintaining a solid relationship. One way to do this is by sending a warm welcome email, which also serves a practical purpose: email verification.
Below are the tests we wish to write code for with regards to sending email to new users
import jwt
from django.conf import settings
from django.utils import timezone

def test_confirm_registration_pass(api_client, create_sample_user, sample_user_data):
    confirm_registration_url = reverse("confirm_registration")
    sample_user_data.update(
        {"id": 9, "email": "tuttest1@ecoms.com", "password": "ecoms_1029"}
    )
    new_user = create_sample_user(**sample_user_data)
    token = new_user.get_confirmation_token
    response = api_client.get(f"{confirm_registration_url}?token={token}")

    assert response.status_code == 302
    assert Account.objects.get(email="tuttest1@ecoms.com").verified


def test_confirm_registration_fail(api_client, create_sample_user, sample_user_data):
    confirm_registration_url = reverse("confirm_registration")
    sample_user_data.update(
        {"id": 9, "email": "tuttest1@ecoms.com", "password": "ecoms_1029"}
    )
    new_user = create_sample_user(**sample_user_data)
    response = api_client.get(f"{confirm_registration_url}")

    assert response.status_code == 302
    assert not Account.objects.get(email="tuttest1@ecoms.com").verified

    # test for expired token
    token = new_user.get_confirmation_token
    payload = jwt.decode(token, settings.SECRET_KEY, algorithms=["HS256"])
    payload["exp"] = int(timezone.now().strftime("%s"))
    token = jwt.encode(payload, settings.SECRET_KEY, algorithm="HS256")
    response = api_client.get(f"{confirm_registration_url}?token={token}")
    assert response.status_code == 302
    assert not Account.objects.get(email="tuttest1@ecoms.com").verified
Push Notification
The moment a new user is added to our database, we want to send them a welcome email that also contains a verification link. This link is essential for confirming the legitimacy of the email address they've provided and for securing their account.
However, it's important to keep user experience in mind. We don't want our users to wait unnecessarily while the email is being dispatched. User satisfaction is key, and a responsive system plays a big role in that.
Leveraging Celery for Background Tasks
To avoid any delay in response, we employ Celery. Celery is an asynchronous task queue/job queue based on distributed message passing. It's focused on real-time operation but supports scheduling as well.
When a new user signs up, we'll quickly respond to the user's action, while Celery takes care of sending the email in the background. This means our application can handle the user's request and send the email without one process blocking the other. It's an efficient way to manage tasks that are secondary to the user's immediate experience on the platform.
Integrating Celery into our project involves setting up a few components, such as:
Celery Worker: This is the component that will process the background tasks asynchronously.
Message Broker: Celery requires a solution to send and receive messages, and for that, we typically use Redis or RabbitMQ.
Task Definition: We define a Celery task that outlines the steps to send the email, including preparing the email content and handling the sending process.
Once we've set up Celery and integrated it into our Django project, sending the email becomes a task that Celery will handle elegantly in the background. The user gets a swift response upon registration, and the welcome email arrives in their inbox without them ever knowing about the intricate dance of web services that made it happen.
Spin up Celery and Redis containers
In addition to our Django and PostgreSQL containers, we will now spin up two new containers, one for Celery and the other for Redis. Update the docker-compose.yml file with the Celery and Redis service definition
 redis:
    image: "redis:alpine"

  celery:
    build: .
    command: ["celery", "-A", "ecoms", "worker", "--loglevel=info"]
    volumes:
      - .:/app
    depends_on:
      - db
      - redis
We can now allow Celery to auto-pick up tasks, Begin by creating a new file named celery.py within your Django project's main directory - this is typically the one that contains settings.py. Add the code below to the file
from __future__ import absolute_import, unicode_literals
import os
from celery import Celery

# set the default Django settings module for the 'celery' program.
os.environ.setdefault('DJANGO_SETTINGS_MODULE', 'ecoms.settings')

app = Celery('ecoms')

# Using a string here means the worker doesn't have to serialize
# the configuration object to child processes.
app.config_from_object('django.conf:settings', namespace='CELERY')

# Load task modules from all registered Django app configs.
app.autodiscover_tasks()
As outlined in the code above,
Imports: We're importing the necessary modules and Celery itself. The
absolute_importfrom__future__ensures compatibility between Python 2 and 3.Environment Variable: We set the environment variable for the Django settings module, which tells Celery where to find the settings of the Django project.
Celery Instance: We create an instance of the Celery class, which will act as our Celery "application".
Configuration: Celery's configuration is loaded from the Django settings. We specify a namespace (
'CELERY') so Celery will only read settings that start with this prefix.Task Discovery: Finally,
autodiscover_tasks()tells Celery to find tasks in all Django apps automatically. This way, if we define tasks in an app calledaccount, Celery will find and be able to execute these tasks without us manually registering them.
Ensuring Celery Launches with Django
To make sure our Celery worker is ready to start processing tasks as soon as Django is up and running, we need to tweak the __init__.py file in the same directory where our settings.py resides.
Add the following to the __init__.py file:
from __future__ import absolute_import, unicode_literals

# This will make sure the app is always imported when
# Django starts so that shared_task will use this app.
from .celery import app as celery_app

__all__ = ('celery_app',)
The
from __future__import ensures compatibility with Python 2 and makes Python 3's division and print function behave consistently.We then import the Celery app instance from the
celery.pyfile we created earlier. This import isn't merely to referencecelery_appbut to ensure that it's loaded into memory.By setting
__all__, we declare thatcelery_appis the only symbol that should be imported whenfrom ecoms import *is encountered. It's a list of public objects of that module, as interpreted byimport *.
What this means is that the Celery app is considered a part of the project's top-level imports, which Django will load during startup. As a result, all background tasks and worker processes become an integral part of your application lifecycle.
With Celery set up now, we can now create tasks for Celery to run i.e. email sending task. Create tasks.py file in the account app folder and add the code below
from django.core.mail import send_mail
from .models import FailedEmailTasks
from celery import shared_task, Task

# Define a custom Task class to handle failure scenarios
class CallbackTask(Task):
    def on_failure(self, exc, task_id, args, kwargs, einfo):
        """
        This method is called if the task throws an exception
        Here, we log the exception details to our FailedEmailTasks model, which can be used for debugging or retrying the task later.
        """
        FailedEmailTasks.objects.create(
            task_id=task_id,
            exc=str(exc),
            args=args,
            kwargs=kwargs,
            einfo=str(einfo)
        )

# Decorate the function with shared_task to turn it into a Celery task with additional settings.
@shared_task(bind=True, base=CallbackTask, max_retries=2)
def send_email_task(self, subject, message, from_email, recipient_list, html_message):
    """
    This is the Celery task for sending emails
    If the task fails, Celery will attempt to retry it based on the defined max_retries parameter.
    """
    try:
        send_mail(
            subject,
            message,
            from_email,
            recipient_list,
            html_message=html_message
        )
    except Exception as exc:
        # If an exception occurs, retry the task after a delay.
        self.retry(exc=exc, countdown=60)  # countdown is the delay before the retry, in seconds.
CallbackTask subclass that Celery will use to handle task failures elegantly. Should an email-sending operation fail, we record the failure details in a FailedEmailTasks model, enabling us to review or re-attempt the sending process at a later stage.
We then define send_email_task as a shared task, which allows us to call it from anywhere in our Django project. We specify the CallbackTask as its base to ensure that failure handling is as we've designed. With max_retries set to 2, Celery will try to resend the email up to two more times if the first attempt fails, with a 60-second pause between tries.
In the code above, we have introduced the FailedEmailTasks model, let's add the model to the models.py file
class FailedEmailTasks(models.Model):
    task_id = models.CharField(max_length=255)
    exc = models.TextField()
    args = models.JSONField()
    kwargs = models.JSONField()
    einfo = models.TextField()
next is to add to the registration logic to signal Celery to send an email after we successfully save the user's details to the DB. Update the RegistrationView as below
@api_view(["POST"])
@permission_classes([AllowAny])
def RegistrationView(request) -> Response:
    try:
        # add immediately before return line
        # send welcome mail to user
        subject = "Ecoms Welcome Mail"
        message = ""  # this is needed to be empty although html message is to be sent
        from_email = "noreply@example.com"
        recipient_list = [instance.email]
        generated_token = instance.get_confirmation_token
        # Render the HTML template
        html_message = render_to_string(
             "welcome_mail.html",
             {"request": request, "username": instance.username, "confirm_token": generated_token},
         )
       send_email_task.delay(subject, message, from_email, recipient_list, html_message=html_message)
    except:
        ....
Now as you might have guessed, we need to set up the HTML template and update our account model with get_confirmation_token method to generate a token which will be JWT wise.
In the project root directory, create a folder named "templates" and then a file in the templates folder named "welcome_mail.html". Add the html content below to it
<!-- templates/welcome_mail.html -->

<html>
  <head>
    <title>Account Confirmation</title>
  </head>
  <body>
    <h1>Hello, {{ username }}!</h1>
    <p>
      With great happiness I welcome you to our great platform, online shopping got
      much better with Ecoms platform.
    </p>
    <p>
      To conclude your registration. Please follow this link to confirm your mail:
    </p>
    <a
      href="{{ request.scheme }}://{{ request.get_host }}{% url 'confirm_registration' %}?token={{ confirm_token }}"
      >Confirm Account</a
    >
  </body>
</html>
we should not forget to update setting.py file to locate our templates files by updating the TEMPLATES list as shown below
TEMPLATES = [
    {
        "BACKEND": "django.template.backends.django.DjangoTemplates",
        "DIRS": [ BASE_DIR / 'templates'], # updated line
        "APP_DIRS": True,
        "OPTIONS": {
            "context_processors": [
                "django.template.context_processors.debug",
                "django.template.context_processors.request",
                "django.contrib.auth.context_processors.auth",
                "django.contrib.messages.context_processors.messages",
            ],
        },
    },
]
Next is to create the get_confirmation_token method to generate the verification token. update the account model in the models.py file in the account app folder as shown below
import jwt
from django.conf import settings
from django.utils import timezone
import secrets
import string
from datetime import timedelta

class Account(AbstractUser):
    # fields definitions...
    @property
    def get_confirmation_token(self):
        return self.generate_password_reset_account_validation_token()

    def generate_password_reset_account_validation_token(self):
        values = string.ascii_letters + string.digits
        token = "".join(secrets.choice(values) for _ in range(250))
        dt = timezone.now() + timedelta(seconds=settings.CONFIRMATION_LINK_TIMEOUT)
        encode_token = jwt.encode(
            {"token": token, "exp": int(dt.strftime("%s")), "id": self.id},
            settings.SECRET_KEY,
            algorithm="HS256",
        )

        return encode_token
don't forget to install jwt, with virtual environment activated
pip install PyJWT && pip freeze > requirements.txt
And if you have noticed, in the content sent to users as a confirmation email, there exists a link for confirmation. Let's take care of the link by updating the account app utls.py file and views.py file respectively as shown below
urlpatterns = [
    path("register/", views.RegistrationView, name="register"),
    #add new path
    path("confirm-registration/", views.ConfirmRegistration, name="confirm_registration"),
]
@api_view(["GET"])
@permission_classes([AllowAny])
def ConfirmRegistration(request):
    token = request.GET.get("token")
    # redirect user to page to tell them to request for new validation email
    if not token:
        return redirect(settings.CONFIRMATION_MAIL_REQUEST_PAGE)
    # get user id
    user_id, error = decode_jwt(token)
    if user_id and error is None:
        user = Account.objects.filter(id=user_id)
        if user.exists():
            user.update(verified=True)
            return redirect(settings.FRONTEND_HOMEPAGE)
    return redirect(settings.CONFIRMATION_MAIL_REQUEST_PAGE)
next is to update the utils.py file with the decode_jwt method and update settings.py file as shown below
from django.conf import settings
import jwt

def decode_jwt(token) -> tuple:
    try:
        decoded = jwt.decode(token, settings.SECRET_KEY, algorithms=["HS256"])
        user_id = decoded.get("id", None)

        if user_id is None:
            # return None, "Invalid token."
            raise jwt.InvalidTokenError("Invalid token")

        return user_id, None

    except jwt.ExpiredSignatureError:
        return None, "Invalid token."

    except jwt.InvalidTokenError as e:
        return None, "Invalid token."
# settings.py
CONFIRMATION_LINK_TIMEOUT = 3600


EMAIL_BACKEND = 'django.core.mail.backends.console.EmailBackend'


CONFIRMATION_MAIL_REQUEST_PAGE = "https://google.com"
FRONTEND_HOMEPAGE = "https://google.com"

# Use Redis as a message broker.
CELERY_BROKER_URL = 'redis://redis:6379/0'
finally, let's rebuild the containers and spin up new ones, then run our tests
docker-compose up --build -d
docker-compose exec -it web bash -c "python manage.py makemigrations && python manage.py migrate"

docker-compose exec -it web bash -c "pytest account -v"
you should see mail sent to the console in the celery container

Now that we've set the stage with our backend configurations and user registration logic, it's time to interact with our API more tangibly. One of the most powerful tools at our disposal for testing and interacting with APIs is Insomnia. REST client. Insomnia is a desktop application that enables us to craft, send, and analyze HTTP requests and responses without the need to write additional code for testing


And that, concludes our deep dive into setting up user registration in our Django-powered e-commerce application. It's been quite the adventure—from integrating with Celery for asynchronous task processing to ensuring our backend robustly handles new user sign-ups. I trust the journey has been as enlightening for you as it was for me!
As we proceed, our next steps will bring us to the heart of user authentication. We'll explore the intricate processes of securely logging users in and out. Beyond that, we’ll develop a user-friendly password reset feature and delve into the mechanisms for changing passwords, ensuring our users can maintain the security of their accounts with ease.
Stay tuned for our upcoming post, where we'll unravel the complexities of authentication. We'll tackle JWTs, secure session management, and the integration of Django’s built-in authentication views with our RESTful approach.
Please clone the registration branch User Registration Repo to get the code for this post!
Until then, happy coding, and don't forget to push your commits!


