Django to AWS Elasticbeanstalk

I am a software developer with specialization on backend development.
Hello developer and welcome, So you just developed nice django application and want to use AWS to host it but don't want to go through the rigorous steps of setting up EC2, load balancer, database and many more. Congratulations to you, there is AWS elasticbeanstalk which with few commands gets all these set up for you in no time.
In this post, we will set up an elasticbeanstalk and deploy a django application on it.

Assumptions
I will be making assumptions that you have the following steps completed
- Create an account with AWS
- Clone the django application we will use here
- Create virtual environment, activate it and install the requirements
install AWS CLI here
Install elasicbeanstalk following the docs here
first run the application and confirm you can use the registration and login endpoints
Initialize EBS
On the root folder of the application, simply run the the command
eb init
The command above will ask you few questions
- Default Region: pick the region that best serve your customers i.e closest to them, for now let's go for the default by simply pressing enter.
- Select an application: This is the name of your application, let's also press enter here and go with the default
- CodeCommit: This is a secure, highly scalable, managed source control service that hosts private Git repositories. enter 'n' because we are already using Git
- Platform and Platform Branch: The EB CLI will detect that you're using a Python environment. After that, it'll give you different Python versions and Amazon Linux versions you can work with. Pick "Python 3.8 running on 64bit Amazon Linux 2".
- SSH: To connect to the EC2 instances later we need to set up SSH. enter "yes" when prompted.
- Keypair: To connect to EC2 instances, we'll need an RSA keypair. Go ahead and generate one, which will be added to your "~/.ssh" folder.
Now you should have new .elasticbeanstalk folder created with config.yml file which contains all the information that has just been provided by you.
.elasticbeanstalk
└── config.yml
Create the application
Enter the command below to start the application environment creation after which we now deploy the application. This command will also ask you few question
eb create
- Enter Environment Name: press enter to use the default since we are just testing but otherwise you might want to provide a descriptive name for the environment like Data2bots-prod
- Enter DNS CNAME prefix: This will be part of our gateway URL to access the application, again here we can use the default and press enter
- Select a load balancer type: Here we are creating a web application and so we need an application load balancer. So enter 2 (Read more about load balancer here)
- Would you like to enable Spot Fleet requests for this environment?: setting this up will help us launch new instances on-demand based on the criteria that has been set. Yes you guess good, we are not using that here, so say 'n'
Allow AWS to do their things to
- create an environment
- zipped the code files and upload to a new s3 bucket
- create a new application with ec2 instances, load balancer, security and auto-scaling groups.
Check the status
To check the status of our application run the command below
eb status
This should show somethings like below
  Environment details for: Data2bots-dev
  Application name: data2bots
  Region: us-west-2
  Deployed Version: app-6a33-221001_124741397859
  Environment ID: e-b4s8wnxg2r
  Platform: arn:aws:elasticbeanstalk:us-west-2::platform/Python 3.8 running on 64bit Amazon Linux 2/3.3.17
  Tier: WebServer-Standard-1.0
  CNAME: Data2bots-dev2.us-west-2.elasticbeanstalk.com
  Updated: 2022-10-01 12:23:40.282000+00:00
  Status: Ready
  Health: Red
Grab the CNAM and paste in the browser, you should get
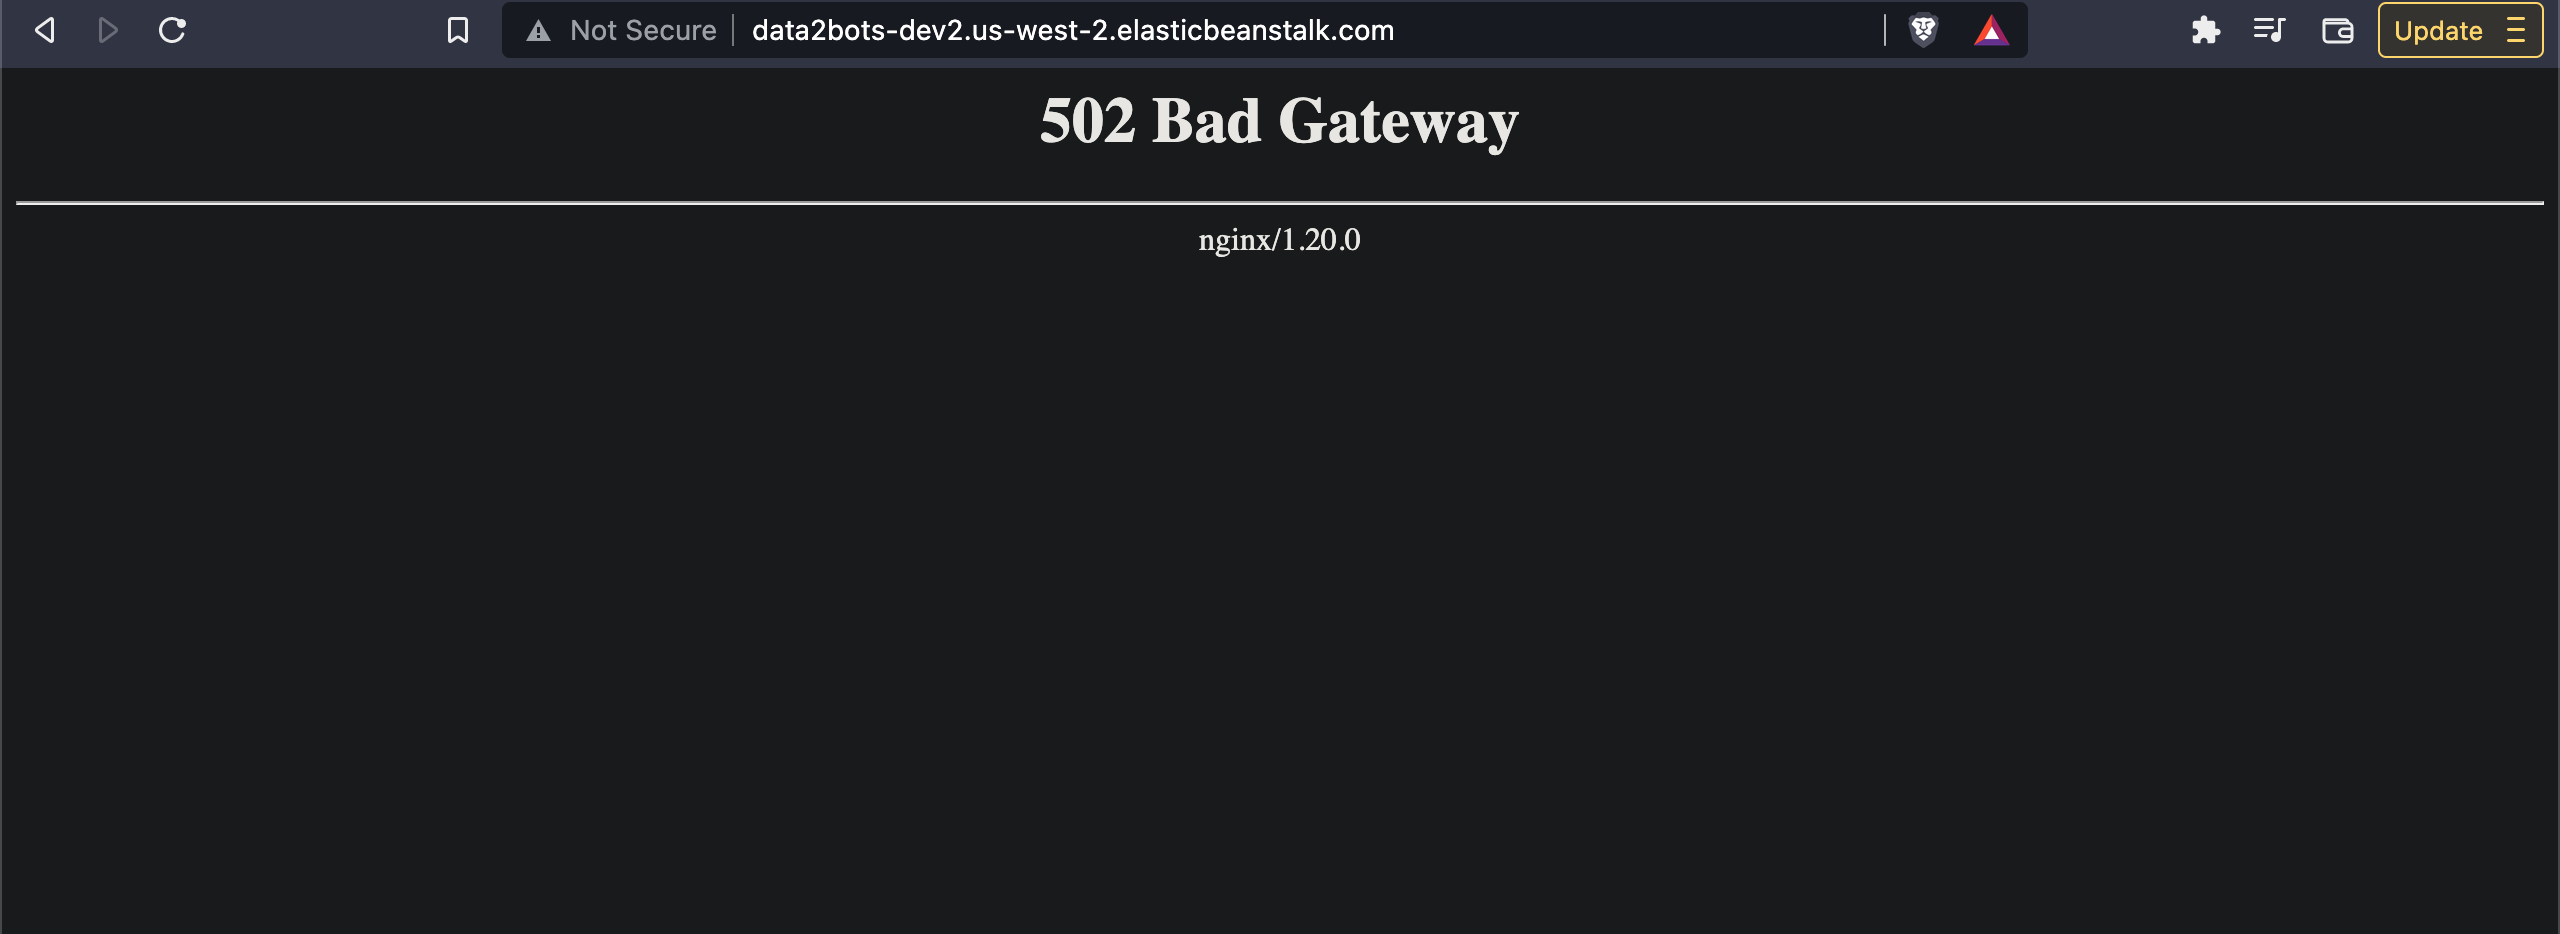
Hun, we have an application with health status of "Red", that is not good at all. There are a few reasons behind it:
- Python needs PYTHONPATH in order to find modules in our application.
- By default, Elastic Beanstalk attempts to launch the WSGI application from application.py, which doesn't exist.
- Django needs DJANGO_SETTINGS_MODULE to know which settings to use.
let's solve this by creating a new folder ".ebextensions" at the root directory of our application, put a new file say 'data2bots.config' and put the content below in it
option_settings:
  aws:elasticbeanstalk:application:environment:
    DJANGO_SETTINGS_MODULE: "data2bots.settings"
    PYTHONPATH: "/var/app/current:$PYTHONPATH"
  aws:elasticbeanstalk:container:python:
    WSGIPath: "data2bots.wsgi:application"
So what's going on here? With these lines we are pointing our ebs environment to the python path, django to it's settings module file and the WSGI file to serve our application.
add , commit and deploy these changes
git add .
git commit -m "added python path, django_settings_module and wsgi file path"

eb deploy
When this is done, run the command below to open the application
eb open
go to the docs path and you should have something like below. This is simply static files serving issue which we will solve right now

Serve Static Files
To serve static files we will be using s3 bucket to hold the files, django-storage and boto3 packages to facilitate the upload. But first we need to set up our database right? So, let's do that now
Set up database
on the terminal type the command below to open the environment console.
eb console
on the left side bar, click on configurations, then scroll down to databases and click edit. You should now have the page below presented to you
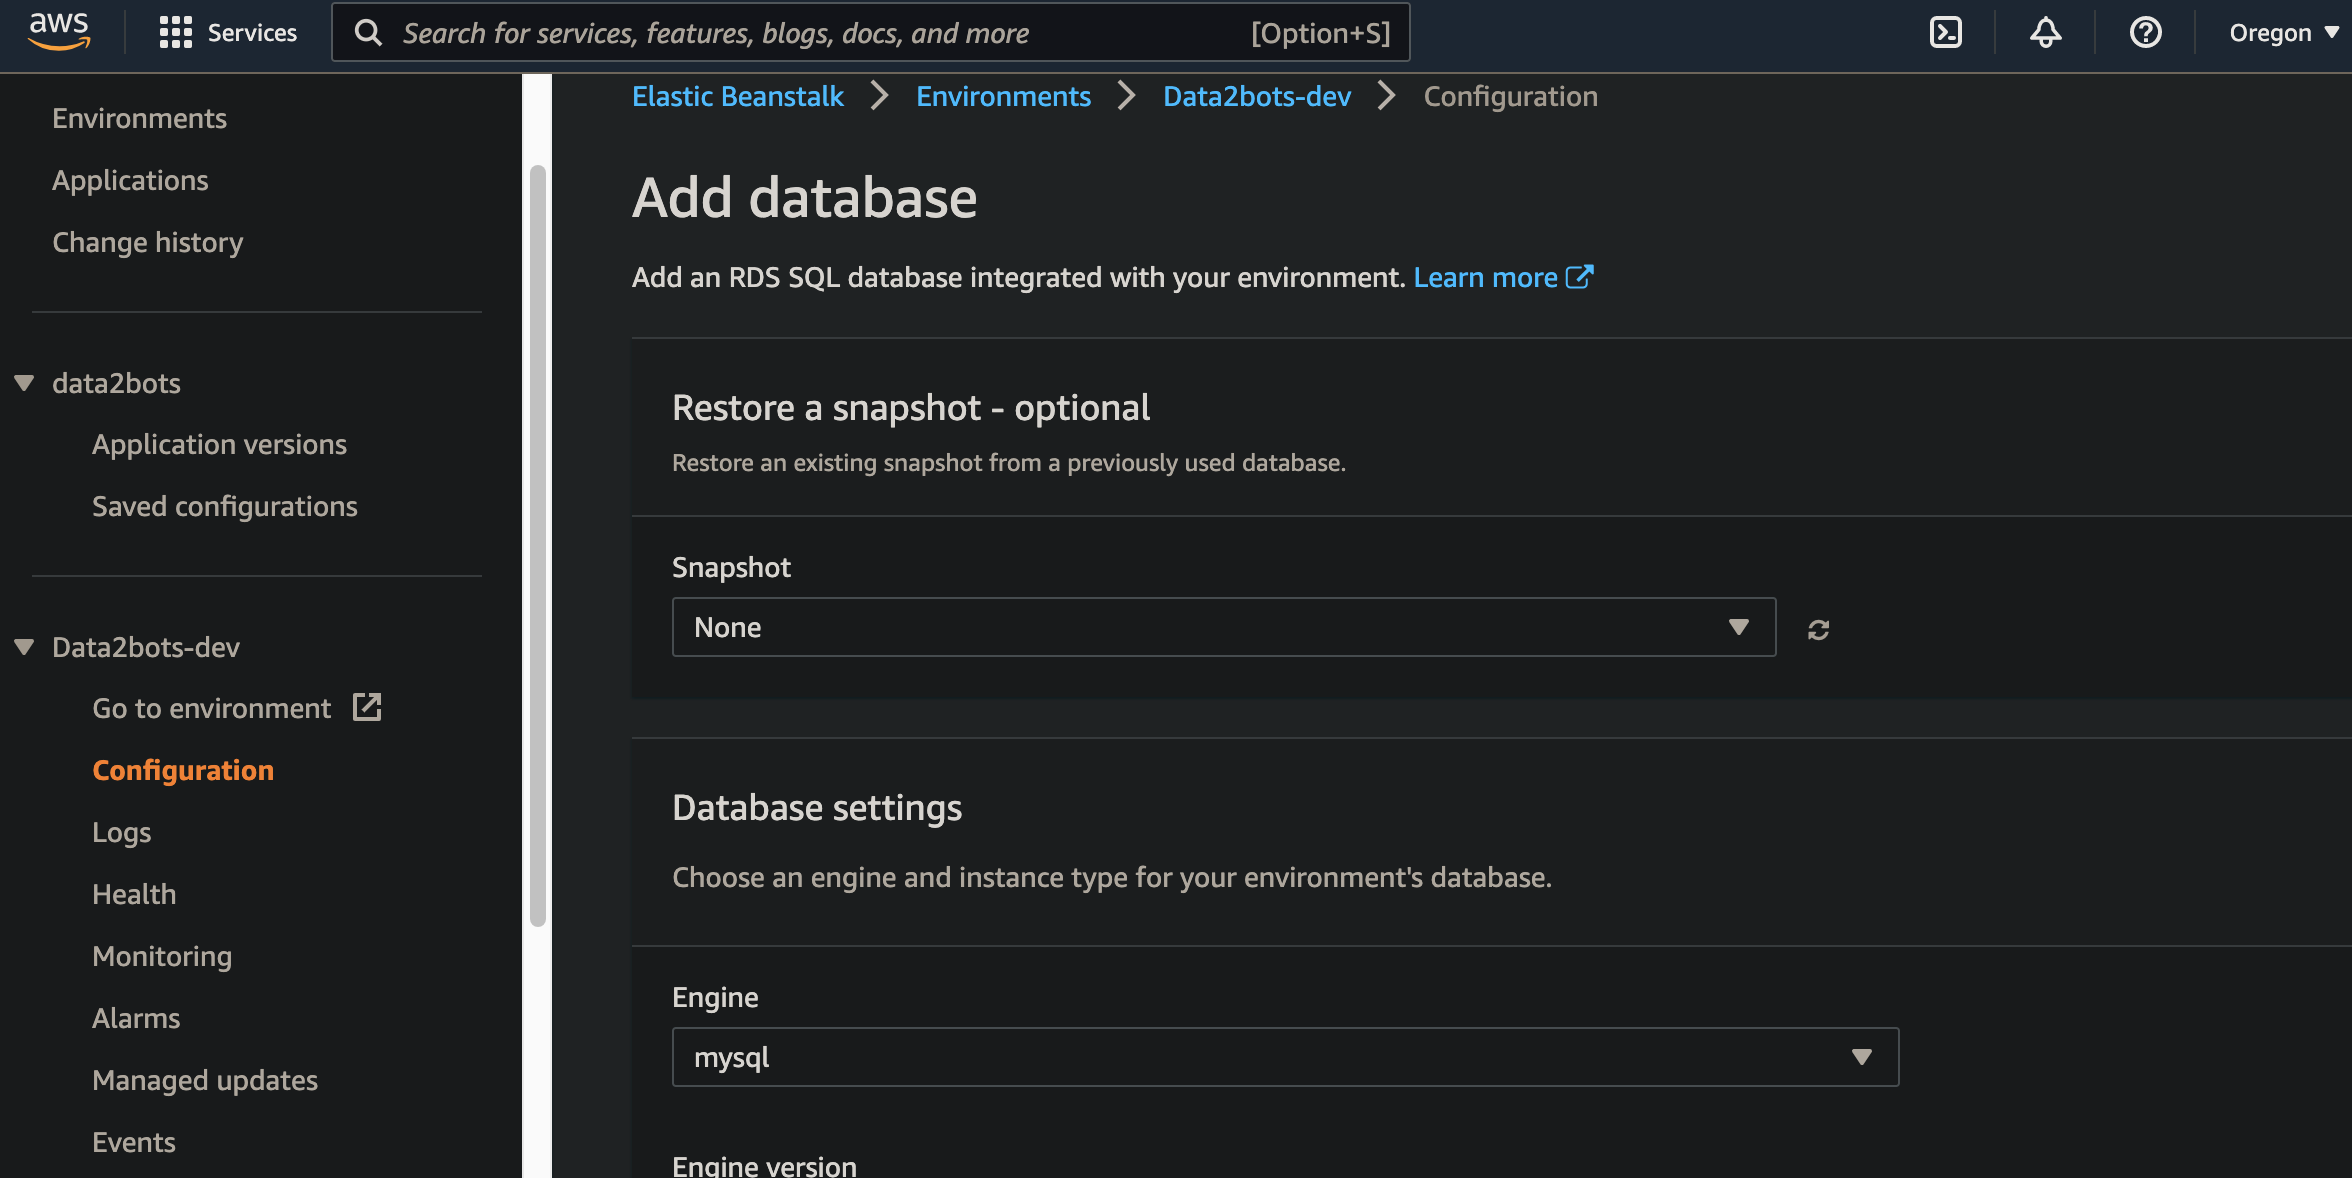
So let's fill the info
- Engine: select postgres
- Engine version: select 21.7 since we can't have access to db.t2.micro for our free tier if we use version 13+
- Storage: put 5 (this will be enough for our testing)
- Username and Password: select a username and password
leave the rest as default, then click apply. If the database is set up successfully EB will automatically pass the following DB credentials to our Django app which we can then use in our settings.py file
RDS_DB_NAME
RDS_USERNAME
RDS_PASSWORD
RDS_HOSTNAME
RDS_PORT
Update the database section of the setting.py file with the code below
if 'RDS_DB_NAME' in os.environ:
    DATABASES = {
        'default': {
            'ENGINE': 'django.db.backends.postgresql_psycopg2',
            'NAME': os.environ['RDS_DB_NAME'],
            'USER': os.environ['RDS_USERNAME'],
            'PASSWORD': os.environ['RDS_PASSWORD'],
            'HOST': os.environ['RDS_HOSTNAME'],
            'PORT': os.environ['RDS_PORT'],
        }
    }
else:
    DATABASES = {
        "default": {
            "ENGINE": "django.db.backends.sqlite3",
            "NAME": BASE_DIR / "db.sqlite3",
        }
    }
Looking at the code above you can see that we have a package to install and update our requirements.txt file also
pip install psycopg2-binary

# update the requirement.txt
pip freeze > requirements.txt
Create s3 bucket
Held over to the AWS console and search for s3, click on it and on the page click on create bucket. Put in a globally unique name and leave other settings as default. you should now have a bucket as shown below

install django-storages and boto3 packages
To facilitate the storing of the files in s3 we will be using django-storages and boto3
pip install django-storages boto3

pip freeze > requirements.txt
Then we can now point Django to that in our settings.py file
if 'AWS_STORAGE_BUCKET_NAME' in os.environ:
    STATICFILES_STORAGE = 'storages.backends.s3boto3.S3Boto3Storage'
    DEFAULT_FILE_STORAGE = 'storages.backends.s3boto3.S3Boto3Storage'

    AWS_STORAGE_BUCKET_NAME = os.environ['AWS_STORAGE_BUCKET_NAME']
    AWS_S3_REGION_NAME = os.environ['AWS_S3_REGION_NAME']

    AWS_S3_ACCESS_KEY_ID = os.environ['AWS_ACCESS_KEY_ID']
    AWS_S3_SECRET_ACCESS_KEY = os.environ['AWS_SECRET_ACCESS_KEY']
Yeah, you guessed right we need to update our environment variables as these ones are not provided automatically by AWS. Set the environment variables from the terminal
eb setenv AWS_STORAGE_BUCKET_NAME='data2bots-bucket' AWS_S3_REGION_NAME='us-west-2' AWS_ACCESS_KEY_ID='your IAM user access key here' AWS_SECRET_ACCESS_KEY='your IAM user secret key here'
don't forget to add django-storage to list of applications
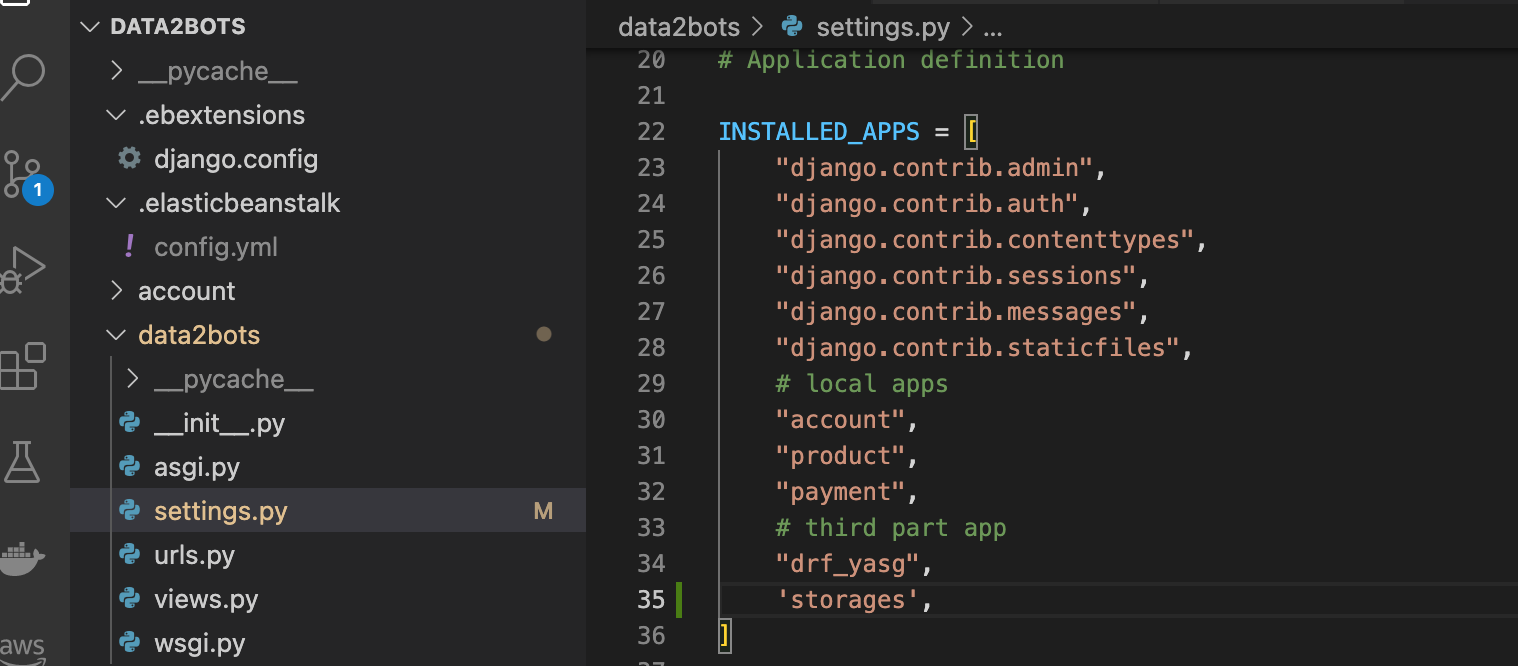
Now, let's add, commit and deploy the lates changes
git add .
git commit -m "added database, django-storage and boto3 package for static files"

eb deploy
Visit the docs page again and we should now still see this page

So what's going on now? We only set up the static files config but we have not collected any static files to be served. Let's tell EBS to do that now
Run makemigrations, migration, createsuperuser and collectstatic commands
Makemigrations, migrate and collectstatic
To tell EBS to run these commands we need to update our data2bots.config file in the .ebextensions with the commands below
container_commands:
  01_makemigrations:
    command: "source /var/app/venv/*/bin/activate && python3 manage.py makemigrations --noinput"
    leader_only: true
  02_migrate:
    command: "source /var/app/venv/*/bin/activate && python3 manage.py migrate --noinput"
    leader_only: true
  03_collectstatic:
    command: "source /var/app/venv/*/bin/activate && python3 manage.py collectstatic --noinput"
    leader_only: true
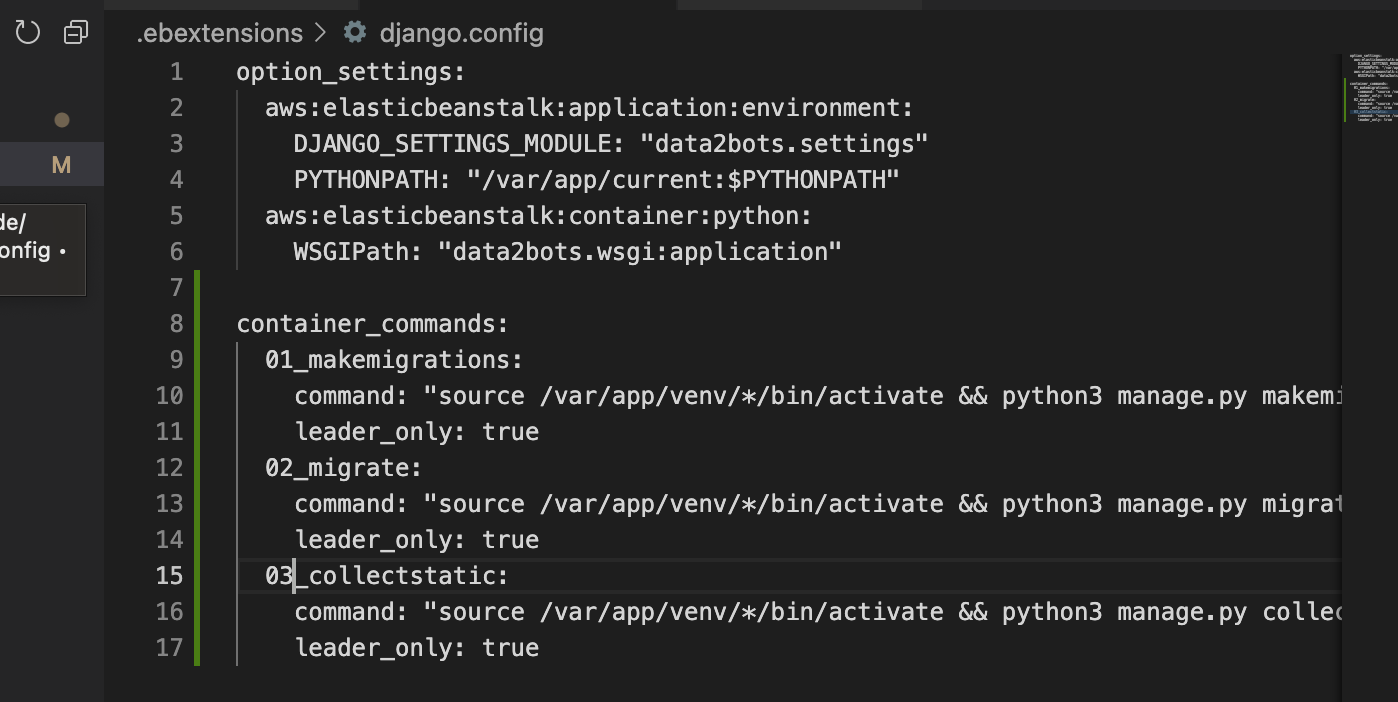
The leader_only is to tell EBS to only run the command for the first EC2 instance if we have more than one up. We should now have our config file look like this
add, commit and deploy the latest changes now
git commit -am "add makemigrations, migrate and collectstatics commands"
eb deploy
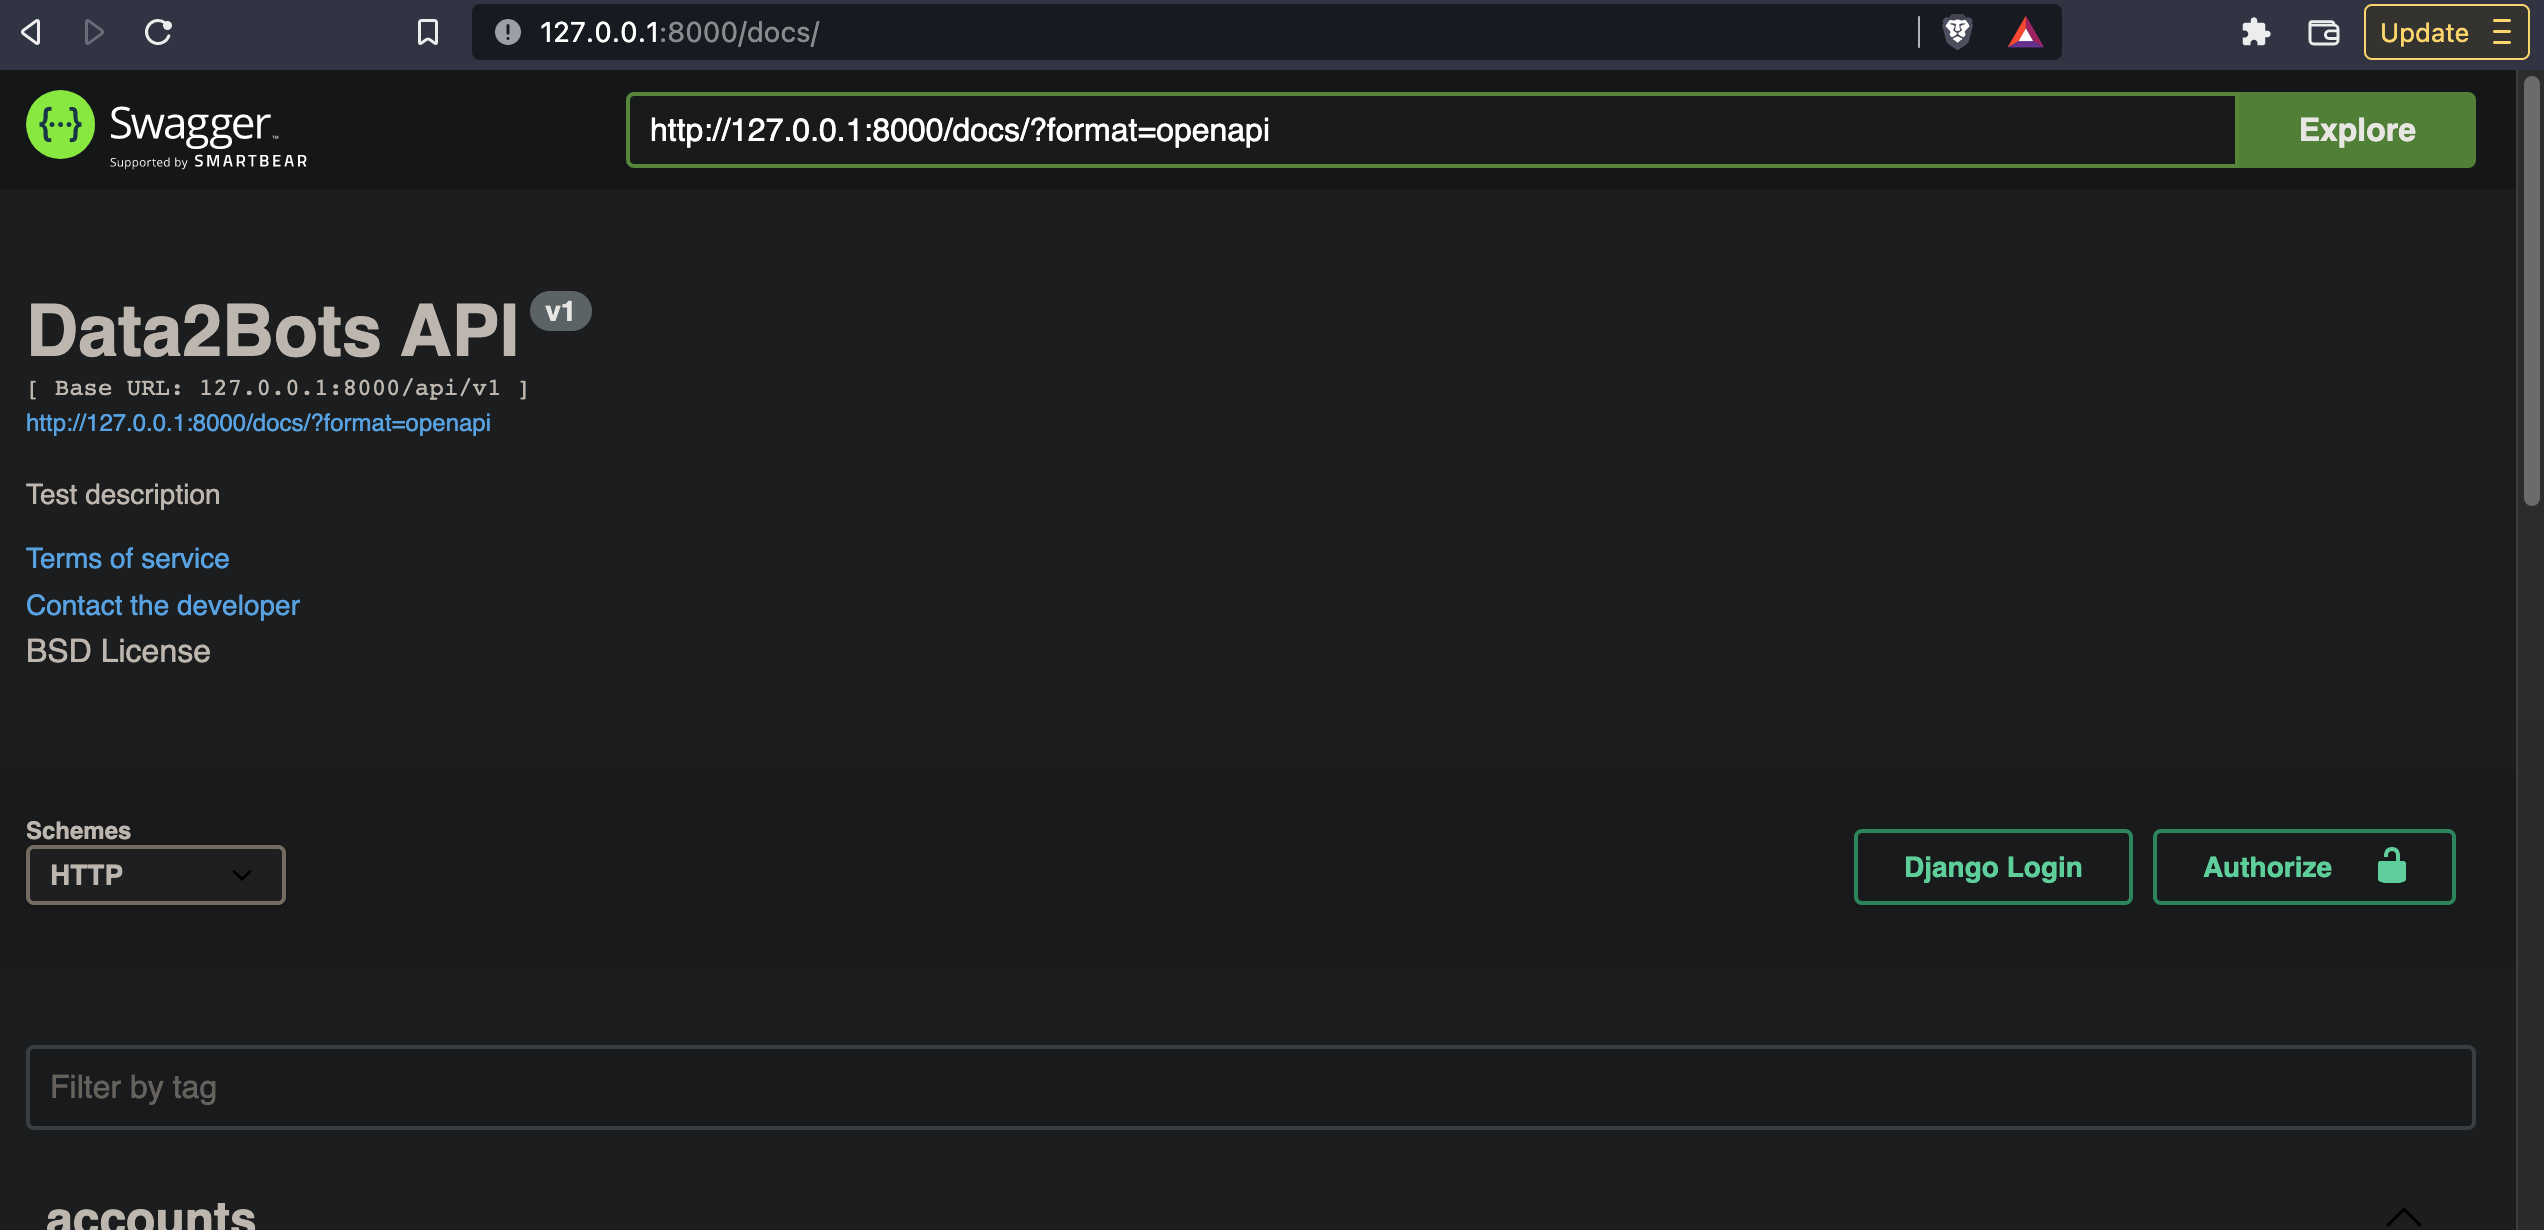
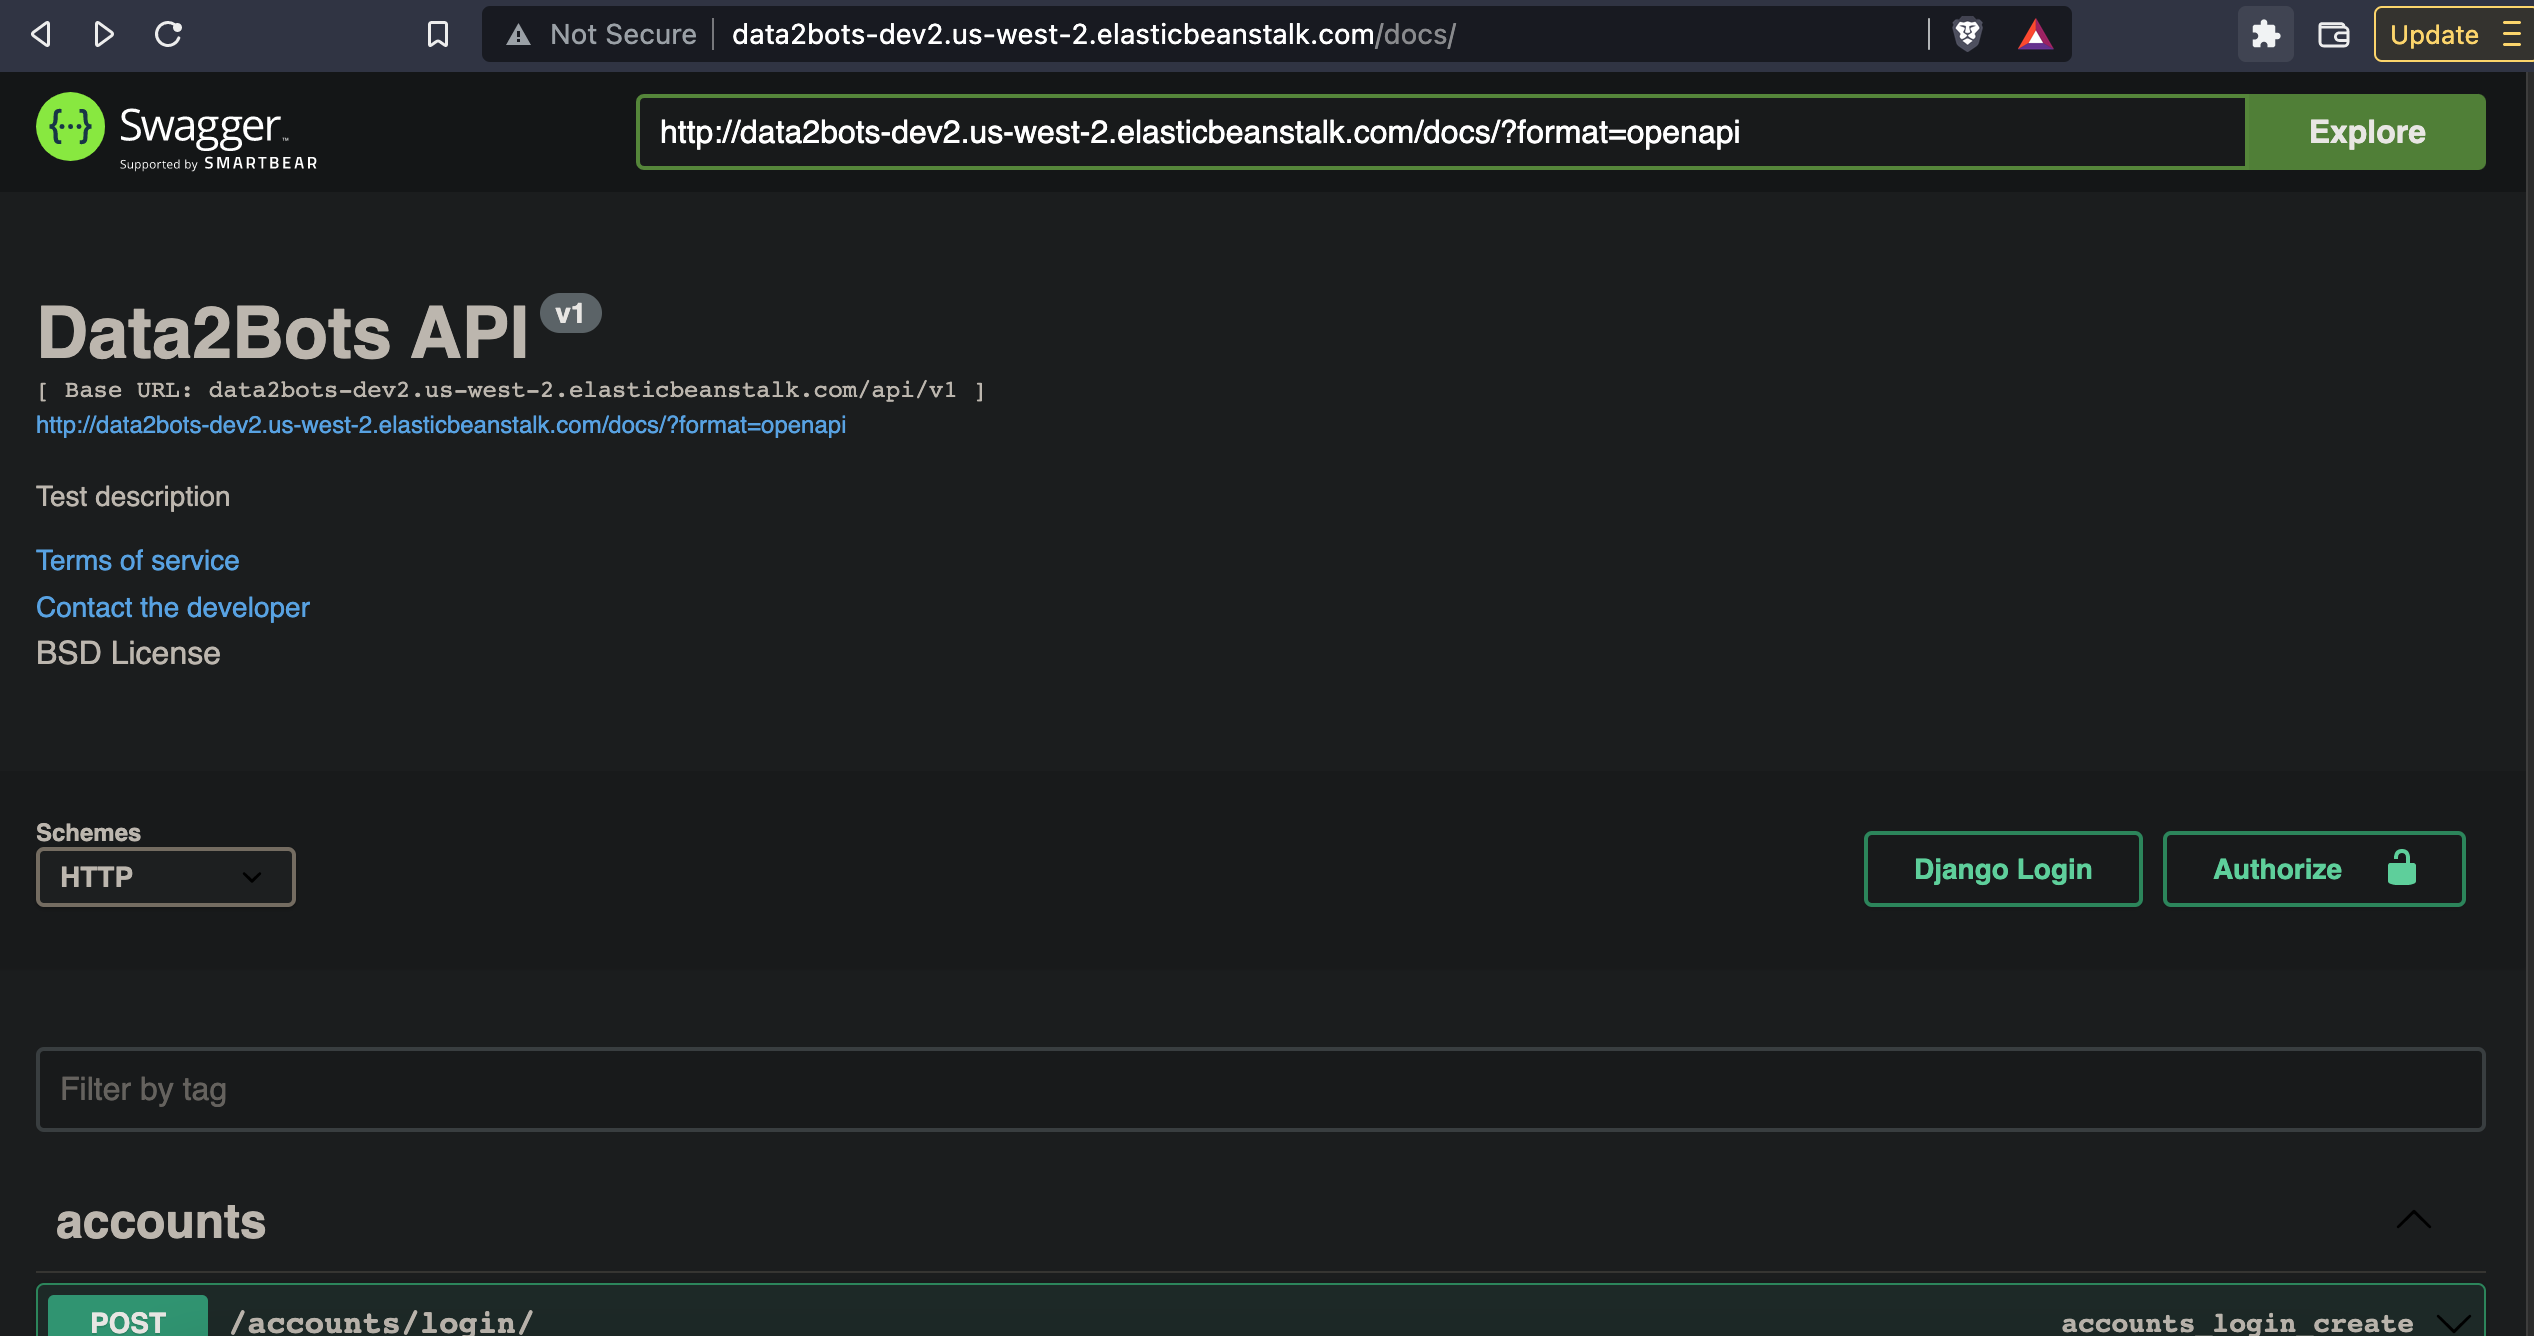
Now go to the docs page i.e CNAME/docs and you should now have this
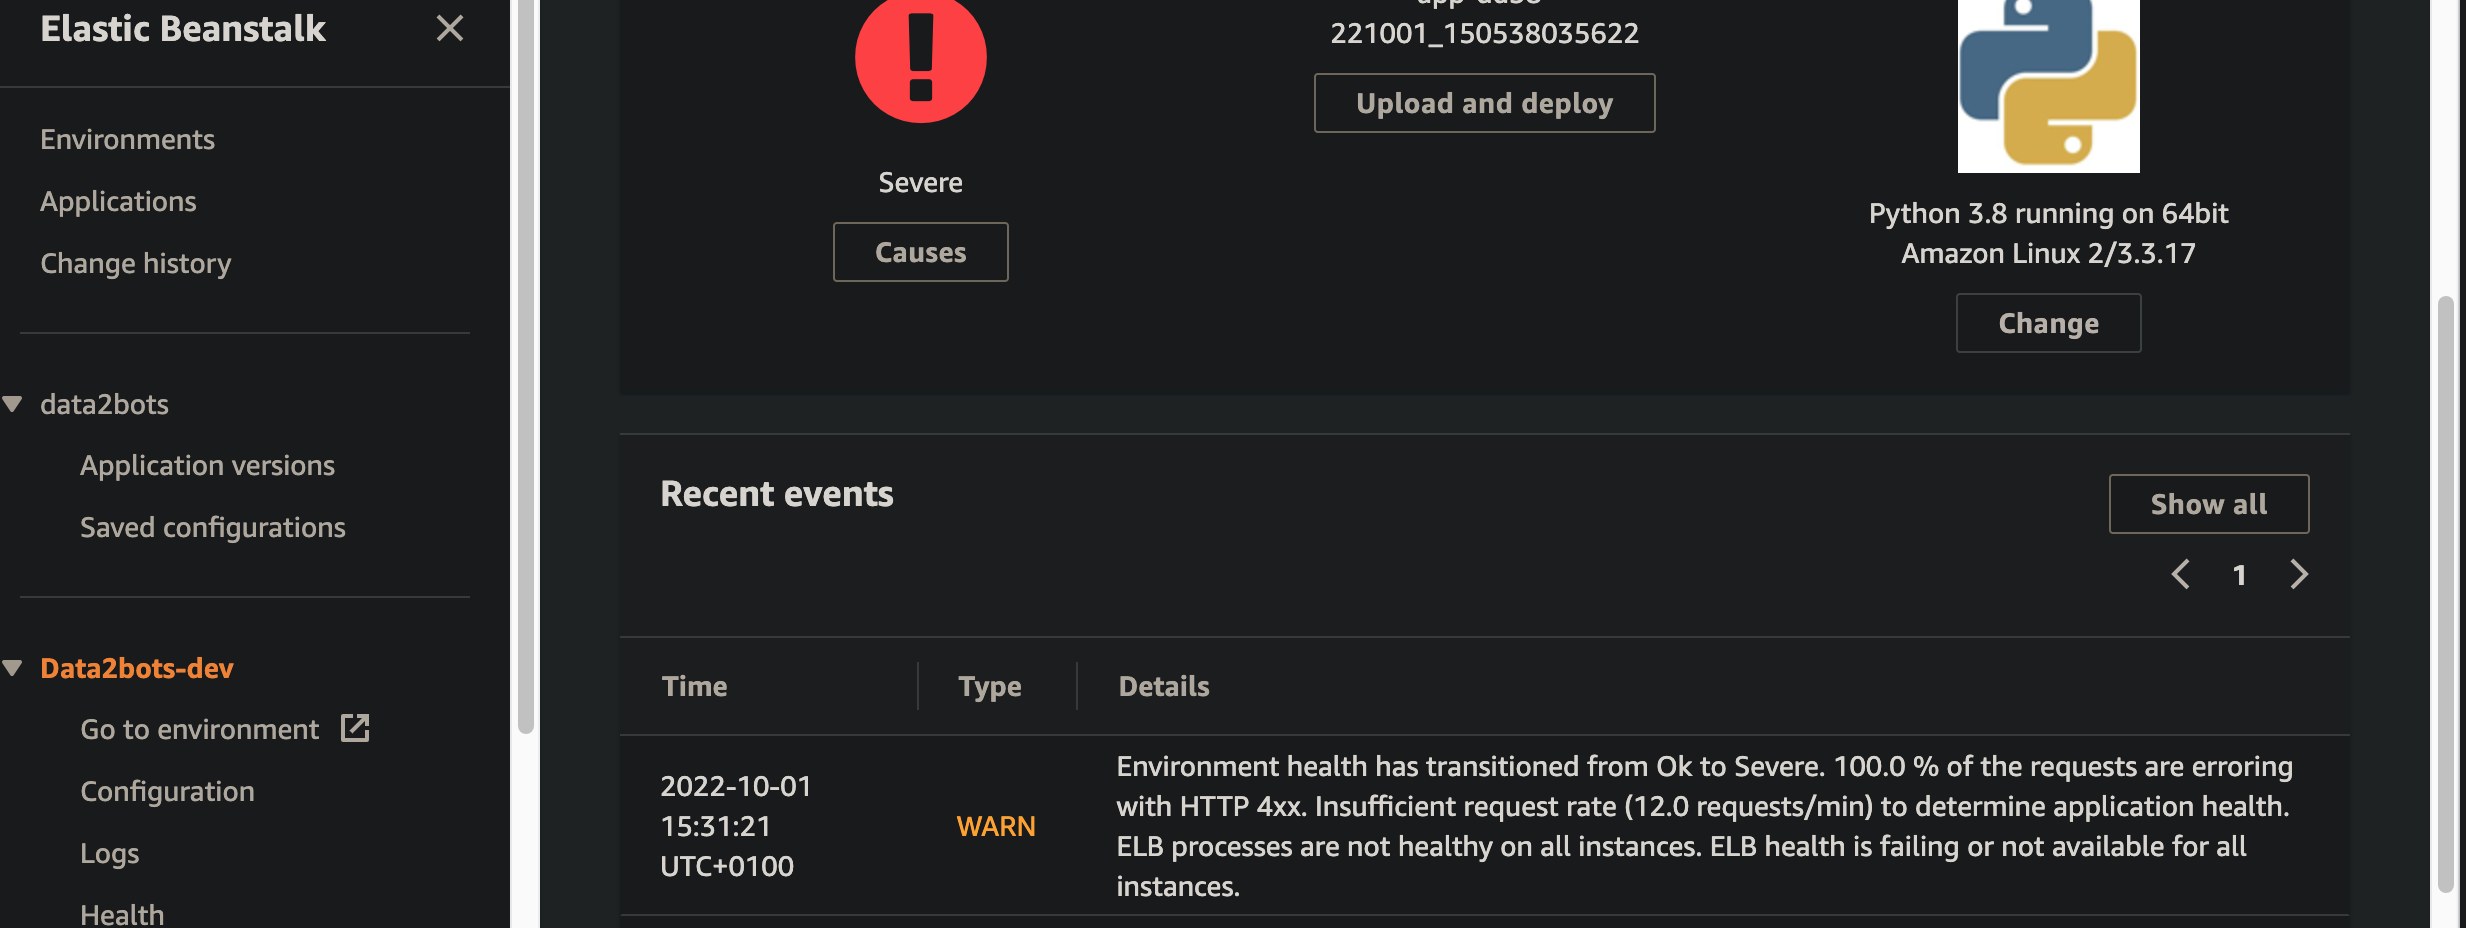
Wow, we did it but wait let's check our health status now by running the command
eb status
what? It's still 'Red"? If you go to the console and check the log as shown here, you will see that there are some 4xx responses causing that. Let's fix that now
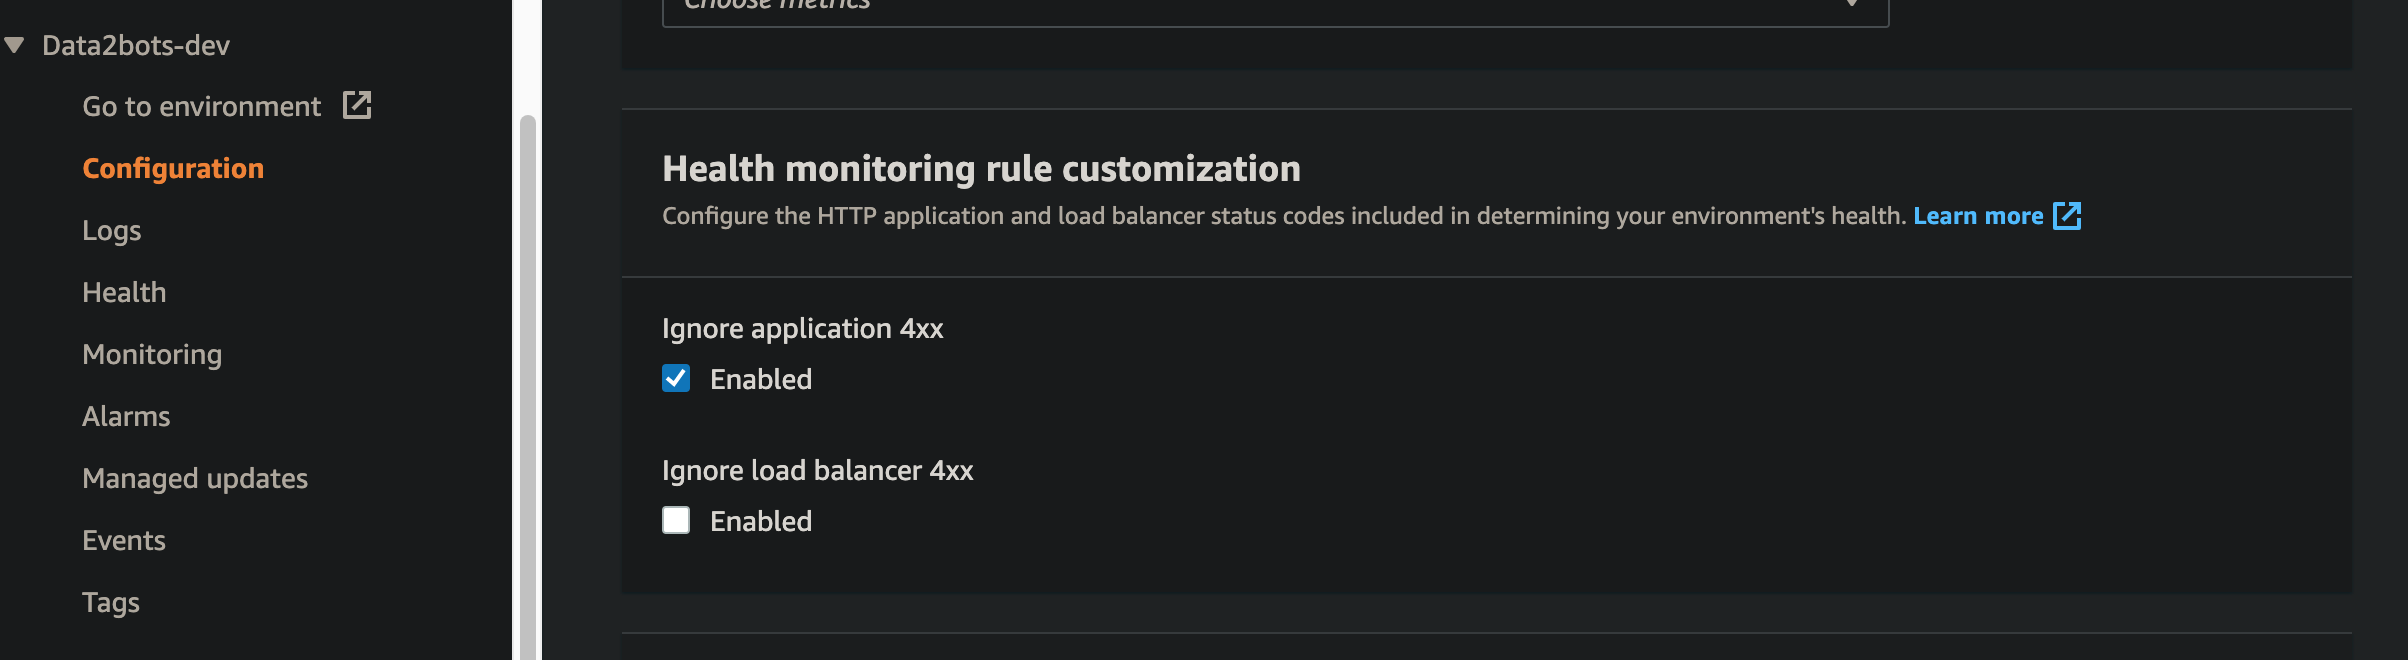
Turn off 4xx error caching
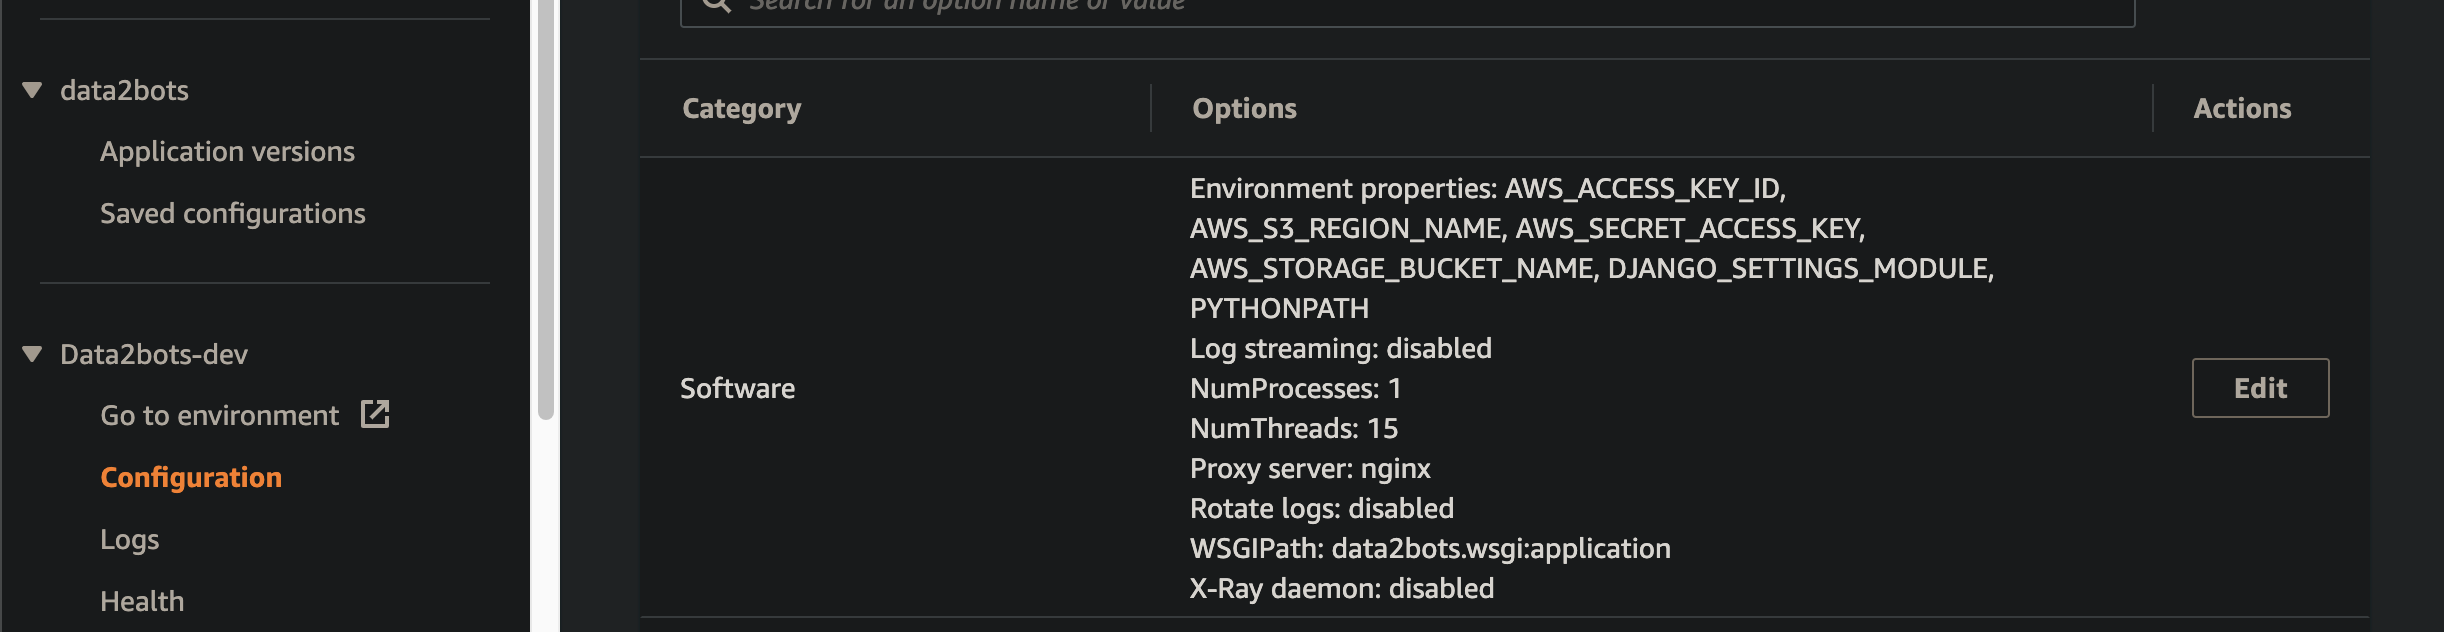
Navigate to the configuration page for the application, scroll down to the monitoring section and click edit. On the page scroll down to "Health monitoring rule customization" and enable the Ignore application 4xx as shown below. Don't forget to apply the changes
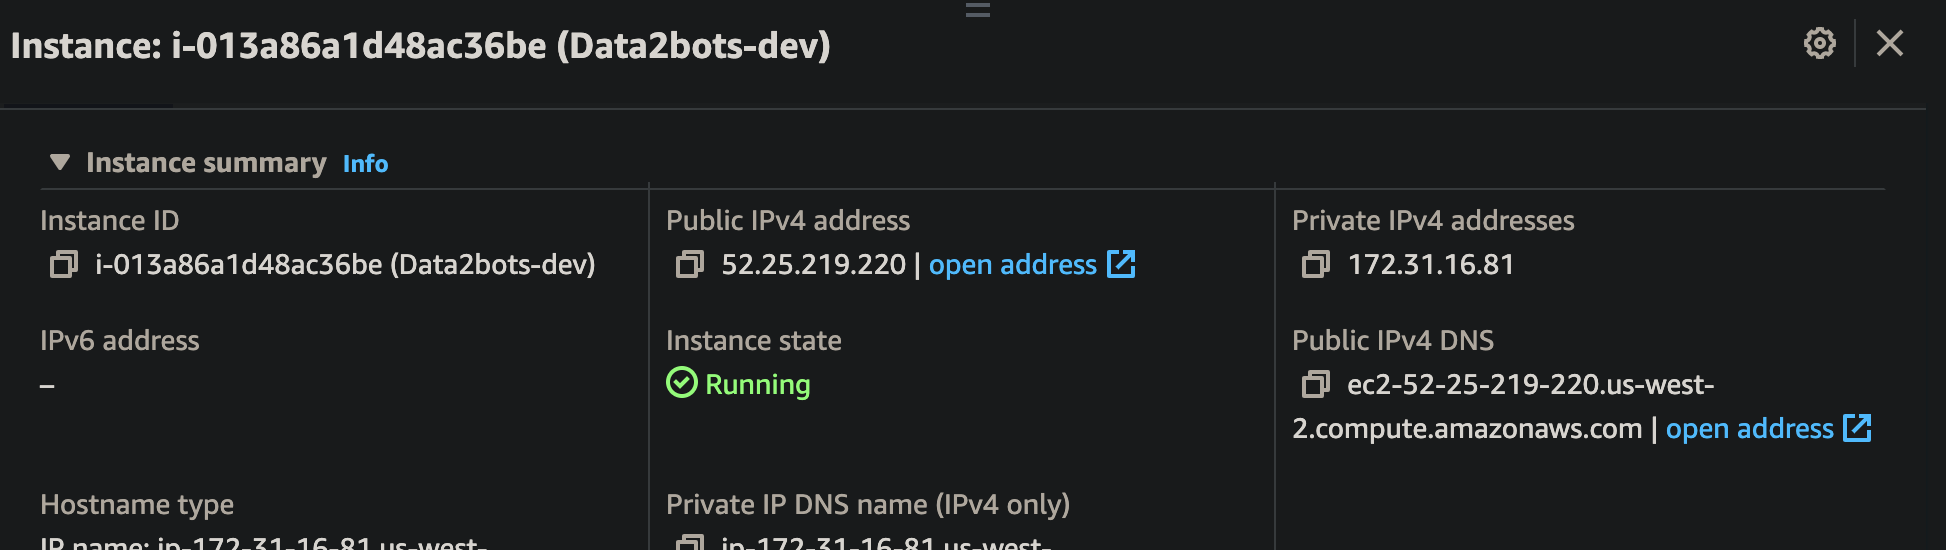
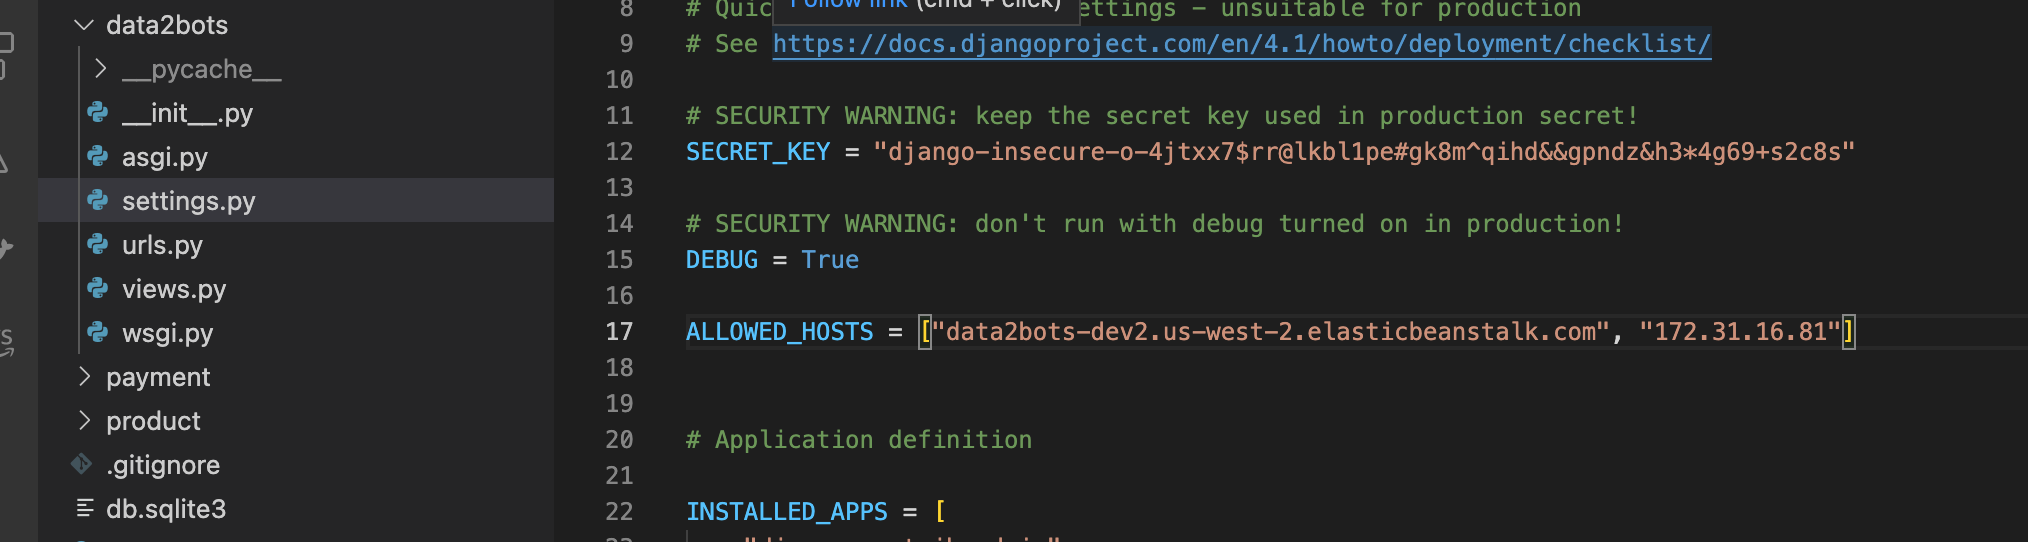
If you check the health status now, It will still be red but after much debug through the log files I found that we need to add the "Private IPv4 addresses" of the ec2 instances running to the list of allowed host and boom we have everything working perfectly.
Create super user
We need to create super user, to be able to log into the admin page by following the steps below
- Create a file structure like this in one of the applications e.g account folder
account
    management
          └── __init__.py
          └──command
                    └──__init__.py
                     createsu.py
put the code below in the createsu.py file
from account.models import User
from django.core.management.base import BaseCommand


class Command(BaseCommand):
    help = 'Creates a superuser.'

    def handle(self, *args, **options):
        if not User.objects.filter(username='admin').exists():
           User.objects.create_superuser(
                email='admin@mail.com',
                password='password1234',
                username="admin"
            )
        print('Superuser has been created.')
So we need to now update set of commands to give to EBS to run by adding the lines below to the /.ebextensions/data2bots.config
04_superuser:
    command: "source /var/app/venv/*/bin/activate && python3 manage.py createsu"
    leader_only: true
The full config file should now look like
option_settings:
  aws:elasticbeanstalk:application:environment:
    DJANGO_SETTINGS_MODULE: "data2bots.settings"
    PYTHONPATH: "/var/app/current:$PYTHONPATH"
  aws:elasticbeanstalk:container:python:
    WSGIPath: "data2bots.wsgi:application"

container_commands:
  01_makemigrations:
    command: "source /var/app/venv/*/bin/activate && python3 manage.py makemigrations --noinput"
    leader_only: true
  02_migrate:
    command: "source /var/app/venv/*/bin/activate && python3 manage.py migrate --noinput"
    leader_only: true
  03_collectstatic:
    command: "source /var/app/venv/*/bin/activate && python3 manage.py collectstatic --noinput"
    leader_only: true
  04_superuser:
    command: "source /var/app/venv/*/bin/activate && python3 manage.py createsu"
    leader_only: true
add, commit and deploy the new changes
git add .
git commit -m "Added created super user command with the credentials"

eb deploy
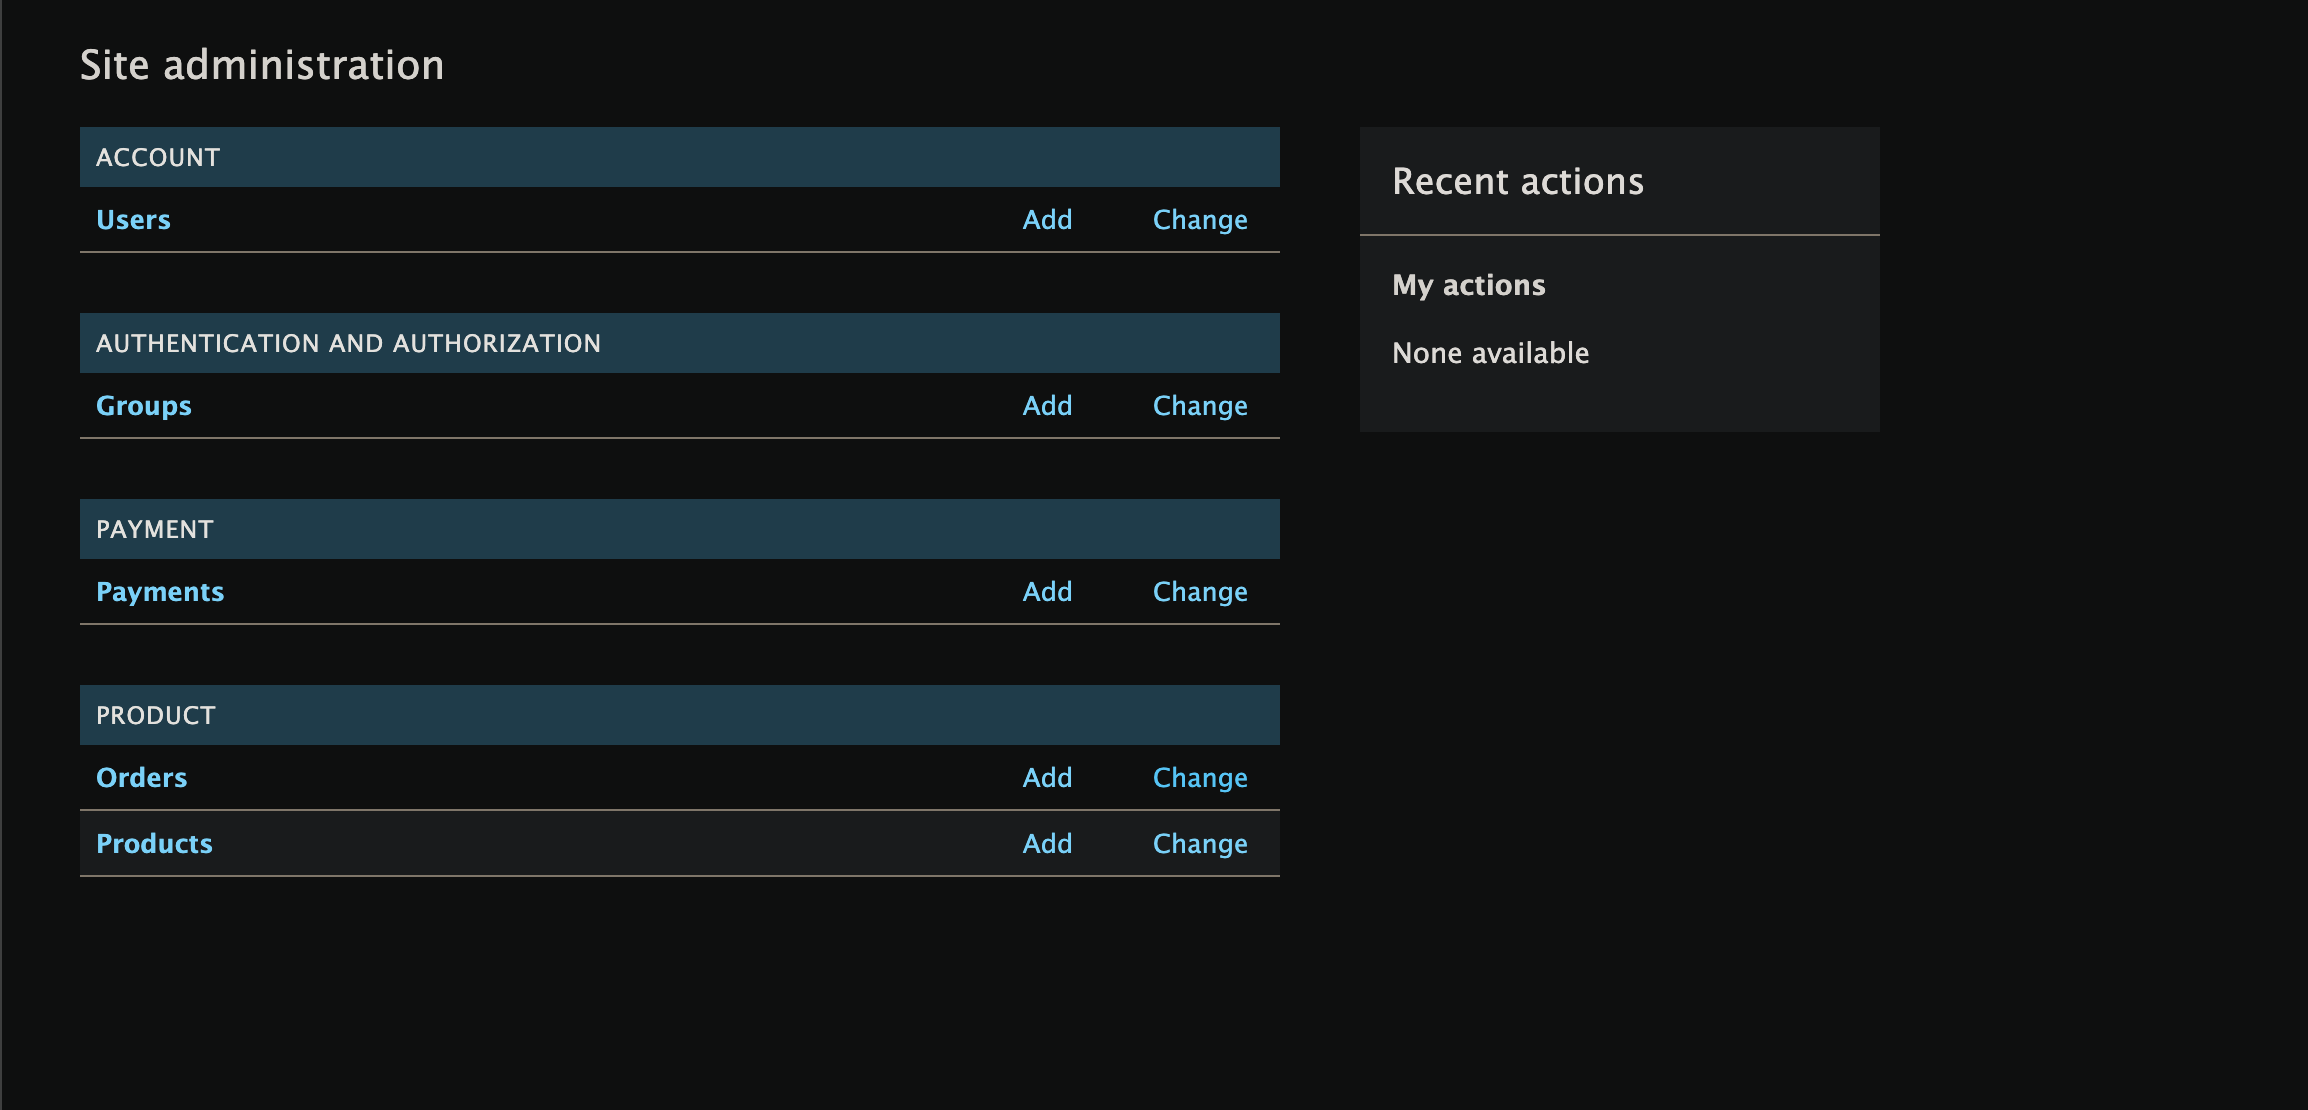
visit the admin page and you should have
Don't forget to check the health and confirm it's of course green
eb status
  Environment details for: Data2bots-dev
  Application name: data2bots
  Region: us-west-2
  Deployed Version: app-40d5-221001_180140989088
  Environment ID: e-b4s8wnxg2r
  Platform: arn:aws:elasticbeanstalk:us-west-2::platform/Python 3.8 running on 64bit Amazon Linux 2/3.3.17
  Tier: WebServer-Standard-1.0
  CNAME: Data2bots-dev2.us-west-2.elasticbeanstalk.com
  Updated: 2022-10-01 17:02:15.998000+00:00
  Status: Ready
  Health: Green
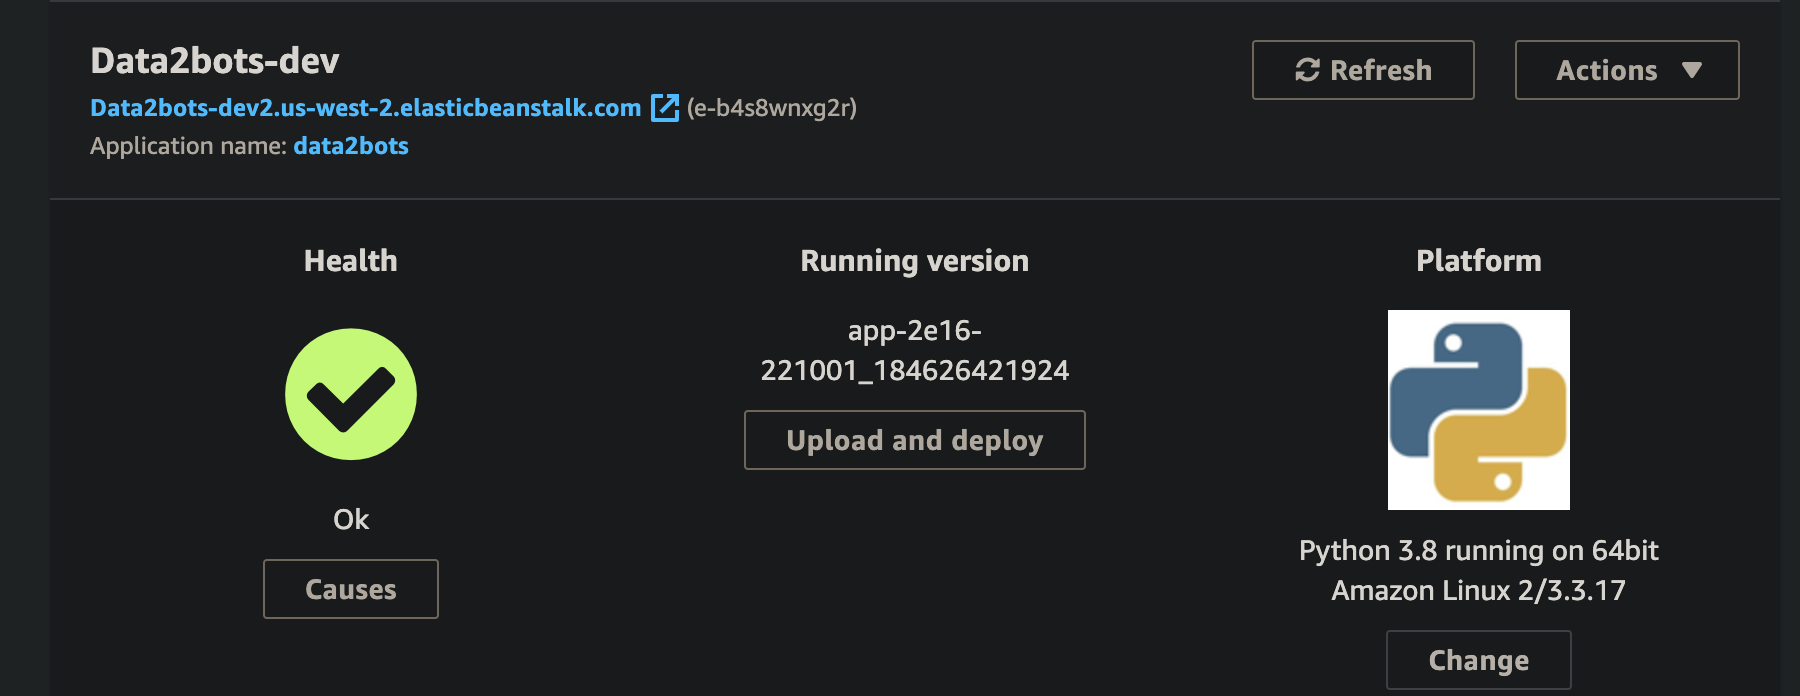
Yeah that's it, we have successfully deployed the application. Take care and stay safe.


