


Hello and welcome, So you know the Django basics and it's time to do some real stuff, right? Okay cool, Let's start with creating an app that gets users' information and stores them in the database.
In this article, we will cover the following
Register new users
Send confirmation email to the newly registered users
Confirm new user and redirect to login if confirmation successful
Register New Users
Django is a robust web framework that comes with a user model which is very much ready to be used but it is bad practice to use the model directly because there may be a need to add a new field to the user model after production, but Django will not allow this unless you create another table and link it to the User table or you clear the database and rebuild it again.
Okay, That being said, Let's set up our project and app for building
#create virtual environment with your installed python version

pipenv --python 3.9.6

#Activate the virtual environment
pipenv shell

#install django
pipenv install django

#Django create project
django-admin startproject authy

#navigate to the manage.py directory
cd authy

#create user app
python manage.py startapp users

#Open the folder in your favourite text editor.... i love vs code
code .

#Add the app to the list of installed app in the project's settings.py file
INSTALLED_APPS = [
    'users', #Added line
    'django.contrib.admin',
    'django.contrib.auth',
    'django.contrib.contenttypes',
    'django.contrib.sessions',
    'django.contrib.messages',
    'django.contrib.staticfiles',
]
So with the Django MVT structure, Let's start with the user model. Go to the models.py file in the user app and paste the code below
#import django Abstract user for extension
from django.contrib.auth.models import AbstractUser

class User(AbstractUser):
    phone_number = models.CharField(max_length=30, blank=True)
    is_verified = models.BooleanField(default=False)
But wait, what is going on here you may wonder, The AbstarctUser being inherited by our User model has already defined fields like username, email, first_name, last_name, last_login, date_joined, is_staff,is_superuser, etc. So we are just adding the phone_number and is_verified field to the list.
Since we have modified the default user model we need to tell Django to be aware of this by going into the settings.py file and paste the code below
#AUTH_USER_MODEL = 'appname.modelname'
AUTH_USER_MODEL = 'users.User'
Now is the time to create our database by running the commands below in the terminal and then createsuperuser
python manage.py makemigrations

python manage.py migrate

#createsuperuser
python manage.py createsuperuser
Great, now start the server and head to the admin page to login. If successfully logged in you should see something like below
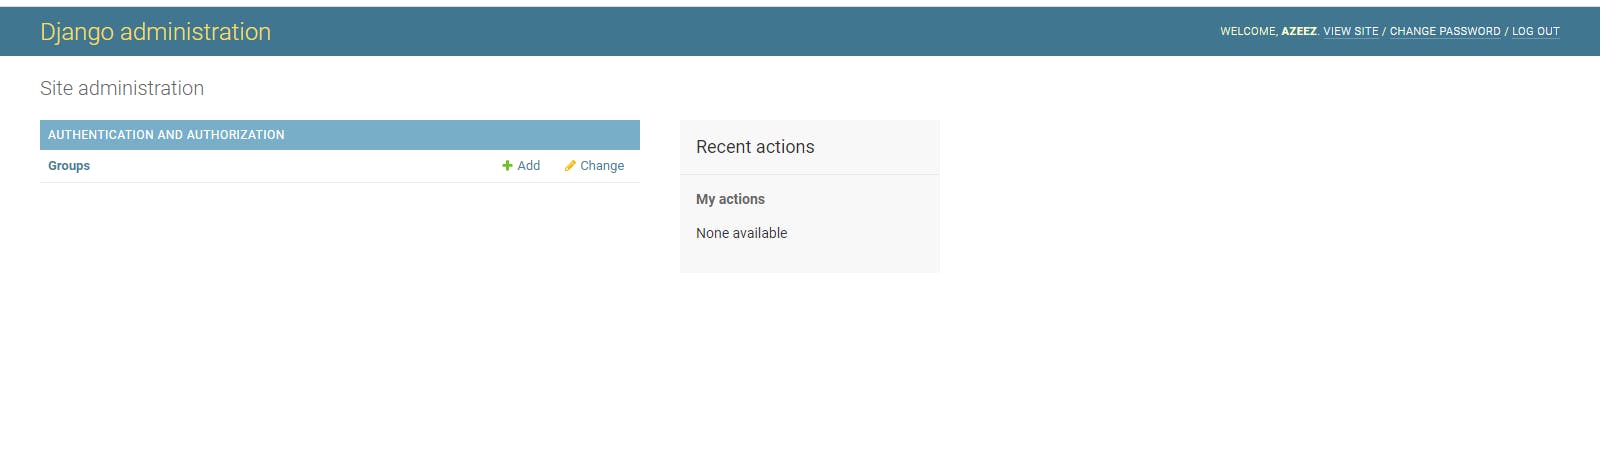
But wait our User table has disappeared, To correct this we will go into the admin.py file inside our app folder and add the lines below
from .models import User

class UserAdmin(admin.ModelAdmin):
    list_display = ('username', 'email', 'is_superuser', 'is_verified')


admin.site.register(User, UserAdmin)
and boom here we have our User table on the admin page
Now, we move to the view sections of the structure to create our signup URL, view, and forms.
Head over to the projects urls.py file and add the line below to extend our application urls to the project urls as Django reads URLs only in the project directory and not the app
#include is added here
from django.urls import path, include

urlpatterns = [
    path('', include('users.urls'))     #Added line
]
Now create urls.py file in the application folder and add the lines below
from django.urls import path
from .views import home,signup

urlpatterns = [
    path('', home, name = 'home'),
    path('register/', signup, name = 'signup'),
]
Yes you guessed right, the next thing we will do is go to the application view.py file and update it with the lines below
from django.shortcuts import render,redirect
from .forms import SignUpForm
from django.contrib import messages

def home(request):
    return render(request, 'users/base.html')

def signup(request):

    if request.method == 'POST':
        form = SignUpForm(request.POST)
        if form.is_valid():
            save_form = form.save(commit = False)
            save_form.set_password(form.cleaned_data.get('password'))
            save_form.save()
            messages.success(request, 'User registered successfully')
            return redirect('signup')
        else:
            return render(request, 'users/signup.html', {'form':form})

    return render(request, 'users/signup.html')
So when a user goes to the homepage the home view will be executed which will display the base.html file and if the user goes to /register/, the signup view will be executed to present the signup.html file.
Note that in the signup view, we are using a SignupForm which we have not created, So create a forms.py file in the application folder and add the lines of code below
from django import  forms
from .models import User
from django.core.exceptions import ValidationError

class SignUpForm(forms.ModelForm):

    class Meta:
        model = User
        #Add fields we will be collecting info for
        fields = ['first_name','last_name','username', 'email', 'password','phone_number']

    #DO form cleanig here
    def clean_username(self):
        username = self.cleaned_data['username']
        if  User.objects.filter(username = username).exists():
            raise ValidationError('Username is not available')
        return username

    def clean_email(self):
        email = self.cleaned_data.get('email')
        if User.objects.filter(email = email).exists():
            raise ValidationError("Email not available for use")
        return email

    def clean_password(self):
        password = self.cleaned_data.get('password')

        #check password length
        if len(password) < 8:
            raise ValidationError("Password can't be less than 8 characters")
        #check for number and letters is password
        if password.isalpha() or password.isnumeric():
            raise ValidationError("Password should contains both letters and numbers")

        return password

    def clean_phone_number(self):
        phone_number = self.cleaned_data.get('phone_number')
        if phone_number == "":
            raise ValidationError("phone number can't be empty"
        else:
            if User.objects.filter(phone_number = phone_number):
                raise ValidationError("phone number not available for use")
        return phone_number
The cleaning we did in the signup form was to ensure that we avoid two users with the same username, email, and phone_number and also did some password validation rule to ensure user enters a minimum of eight characters which contains letters and numbers
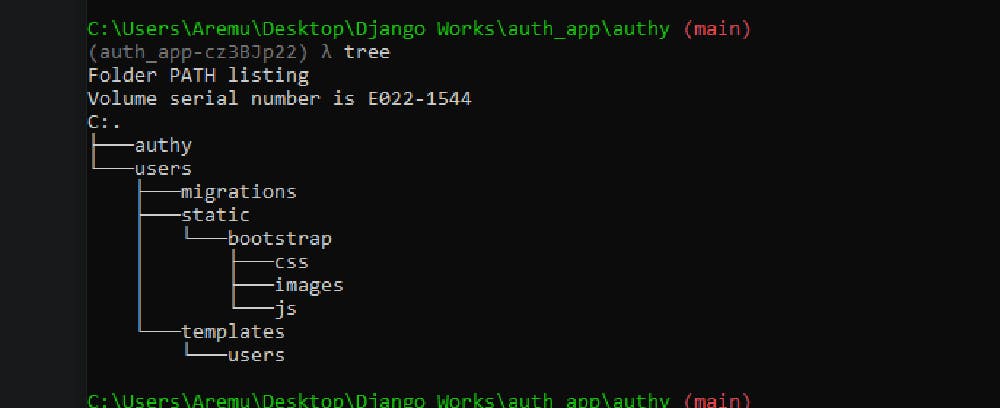
So far so good the users can't see any form to fill in the browser, so let's do that by creating a folder named templates and a subfolder named users in the created templates folder both in our application folder. so you should now have folder structure like below excluding the static folder
Now going back to our signup view, we see that we need to present base.html and signup.html files, so go to the users folder in the template folder of our application create the base.html file and signup.html file and paste in the code below respectively
<!DOCTYPE html>
<html lang="en">
<head>
    {% load static %}
    <meta charset="UTF-8">
    <meta http-equiv="X-UA-Compatible" content="IE=edge">
    <meta name="viewport" content="width=device-width, initial-scale=1.0">
    <title>Django Authentication</title>
    <link rel="stylesheet" href="https://cdn.jsdelivr.net/npm/bootstrap@4.6.0/dist/css/bootstrap.min.css" >
</head>
<body style="background-image:url('/static/bootstrap/images/bg2.png')">


    {% block content %}

    <div class="container mt-5">
        <h2 class="text-info text-center mt-5">Welcome to Authy App</h2>
        <div class="row mt-5">
            <a class="btn btn-info col-md-4 mx-auto" href="{% url 'signup' %}">Sign Up</a>
            <a class="btn btn-info col-md-4 mx-auto" href="{% url 'login' %}">Login</a>
        </div>

    </div>

    {% endblock %}


   <script src="https://code.jquery.com/jquery-3.5.1.slim.min.js"></script>
<script src="https://cdn.jsdelivr.net/npm/bootstrap@4.6.0/dist/js/bootstrap.bundle.min.js"></script>
    <script>let errorElements = document.getElementsByClassName('alert-error');
        [...errorElements].forEach(el=>{el.classList.add('alert-danger')})</script>
</body>
</html>
{% extends 'users/base.html' %}
{% block content %}
<div class="container">
<div class="row">
<form class="col-md-6 mx-auto mt-5" method="POST">
<h3>SignUp Form</h3>
<hr>
{% csrf_token %}
{% if messages %}
{% for message in messages %}
<div class="alert-{{ message.tags }} rounded alert-dismissible text-center my-4 py-2" role="alert">
<button type="button" class="close" data-dismiss="alert" aria-label="Close">
<span aria-hidden="true">×</span>
</button>
{{message}}
</div>
{% endfor %}
{% endif %}
{% for error in form.errors %}
<div class="alert-danger alert-dismissible rounded text-center my-4 py-2" role="alert">
{% if error == 'password' %}
{{form.password.errors.0}}
{% elif error == 'email' %}
{{form.email.errors.0}}
{% elif error == 'phone_number' %}
{{form.phone_number.errors.0}}
{% elif error == 'username' %}
{{form.username.errors.0}}
{% endif %}
</div>
{% endfor %}
<div class="row">
<div class="form-group col-md-6">
<label class="form-label">First Name</label>
<input type="text" class="form-control" name='first_name'>
</div>
<div class="form-group col-md-6">
<label class="form-label">Last Name</label>
<input type="text" class="form-control" name='last_name'>
</div>
</div>
<div class="form-group">
<label class="form-label">Username</label>
<input type="text" class="form-control" name='username' required>
</div>
<div class="form-group">
<label class="form-label">Email</label>
<input type="email" class="form-control" name='email' required>
</div>
<div class="form-group">
<label class="form-label">Password</label>
<input type="password" class="form-control" name='password' required>
<small>
<ul>
<li>minimum of Eight Characters</li>
<li>Contains letters and numbers</li>
</ul>
</small>
</div>
<div class="form-group">
<label class="form-label">Phone Number</label>
<input type="number" class="form-control" name='phone_number'>
</div>
<div class="form-group text-right">
<a class="" href="{% url 'reset_password'%}">Forget password?</a>
</div>
<button type="submit" class="btn btn-block btn-outline-info">Submit</button>
</form>
</div>
</div>
{% endblock %}
So, in our base.html file, we have used Django template block syntax to not repeat the whole HTML file declarations for the signup file and thus in the signup.html file we used the extends syntax to brings in the whole content base.html into the file and then use the block section to replace what needed to be replaced.
Note that the inputs field we used above have the name attribute set to the model field name we want to collect i.e name='username' etc
So let's register a user and see the result
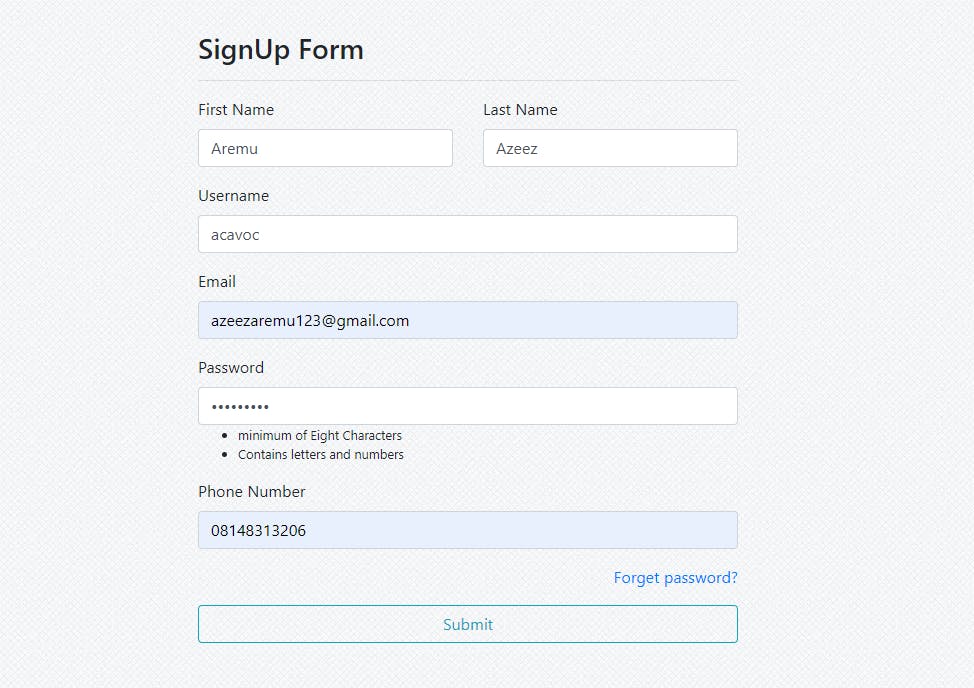
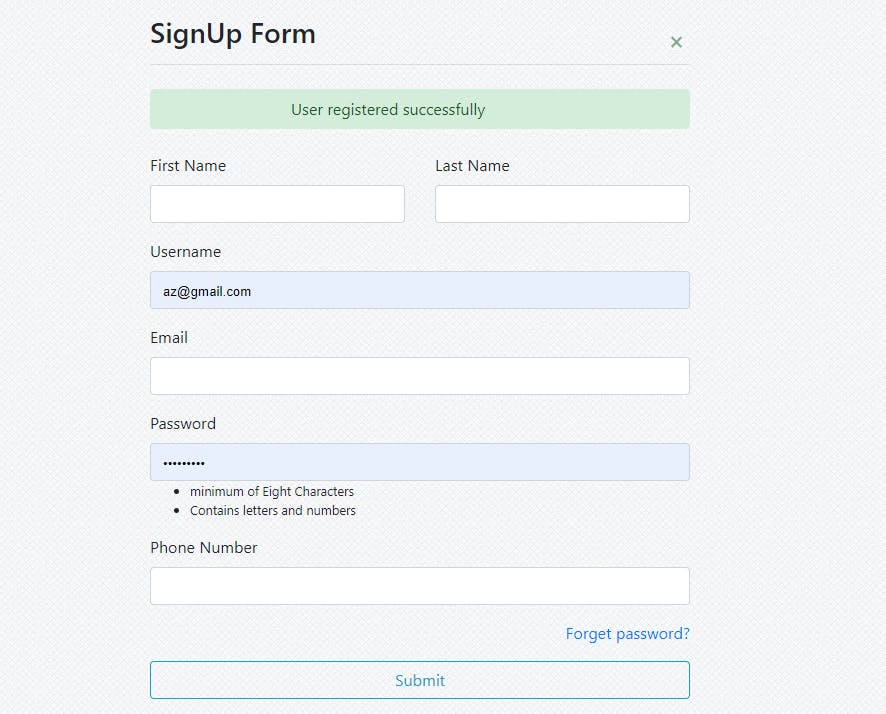
To ensure that it's working okay, why not head over to the admin and see the newly registered user?

Email Sending and Verification
So now we have registered users successfully, but we set the is_verified field to false and we want to ensure that any user with this field being false will not be able to log in. Now let's send a verification email to the user using the Django send mail package and Gmail.
Firstly, we will make use of what we know as Django signal which is a pulse being generated when an action is about to be done or after it's being done. So we will send a signal to send the email immediately after the user has been created successfully in the system.
Go to the application models.py file and update with the lines below
from django.dispatch import receiver
from django.db.models.signals import post_save
from django.utils.encoding import force_bytes
from django.utils.http import urlsafe_base64_encode
from django.contrib.auth.tokens import default_token_generator
from django.core.mail import BadHeaderError, send_mail
from django.template.loader import render_to_string
@receiver(post_save, sender = User)
def send_activation_email(sender, instance, created, **kwargs):
#instance is the user object which has just been created
if created: # check if the user has been created
token = default_token_generator.make_token(instance)
uid = urlsafe_base64_encode(force_bytes(instance.pk))
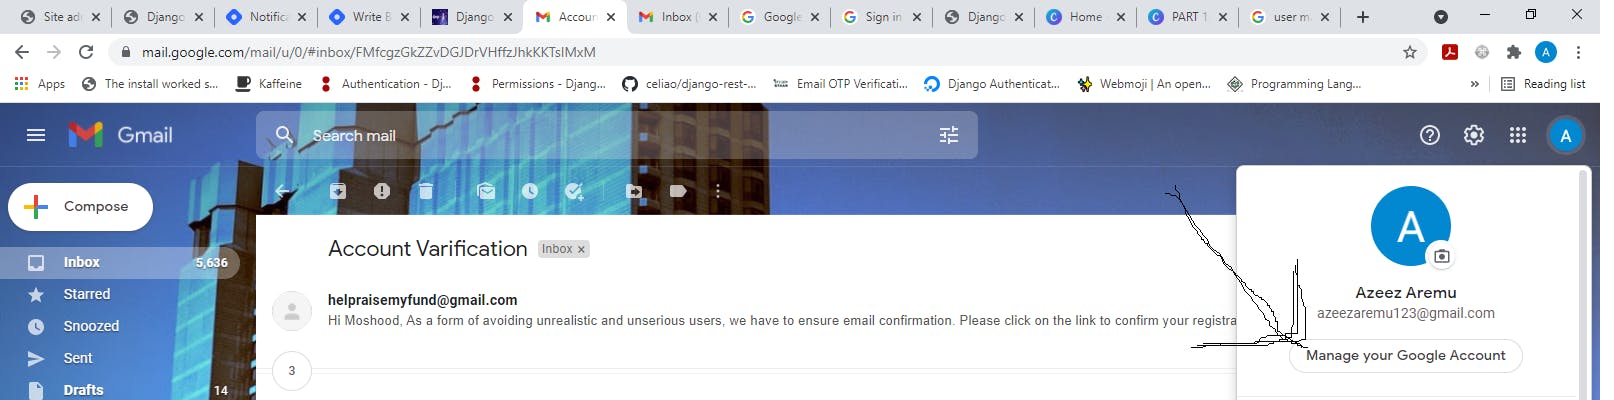
subject = "Account Varification"
html_message = f"""
<div>
<h3>Hi { instance.first_name },</h3>
<p>As a form of avoiding unrealistic and unserious users, we have to ensure email confirmation.
Please click on the link to confirm your registration</p>
<a href=\"http://localhost:8000/activate/{uid}/{token}\" style="color:white; text-decoration: none;border-radius: 25px; background-color: #754C28; padding: 7px 25px;"> <strong>Verify Email<strong></a>
<br><br>If you think, it's not you, then just ignore this email. Thank you.
</div>"""
email_content = ""
try:
send_mail(subject, email_content, "senderemail@gmail.com", [instance.email], fail_silently=False, html_message=html_message)
except BadHeaderError:
pass
In the code above, We are using a post_save signal to send the email, the email has a unique link that has an encoded UID(user identification number from user's primary key) and also a token that has been generated via the project secret_key, user's account creation time, current timestamp and user identification number.
The send_mail package used takes in the email_subject or heading, email_content, or message which will be overridden if the html_message is provided, sender's email address, list of recipients.
Since the domain in the link we sent to the user is localhost, then we need to add that to the list of the allowed hosts in the settings.py file i.e
#Update the settings.py file Allowed host list which was empty
ALLOWED_HOSTS = ['127.0.0.1','localhost']
Now to send the email, we need to provide some credentials as shown below in the settings.py file
EMAIL_USE_TLS = True
EMAIL_HOST = "smtp.gmail.com"
EMAIL_BACKEND = "django.core.mail.backends.smtp.EmailBackend"
EMAIL_HOST_USER = "sender email address"
EMAIL_HOST_PASSWORD = "sender password"
EMAIL_PORT = 587
The password being used above is not the same as the one you use to always login into your Gmail account, To get the password to use follow the steps below
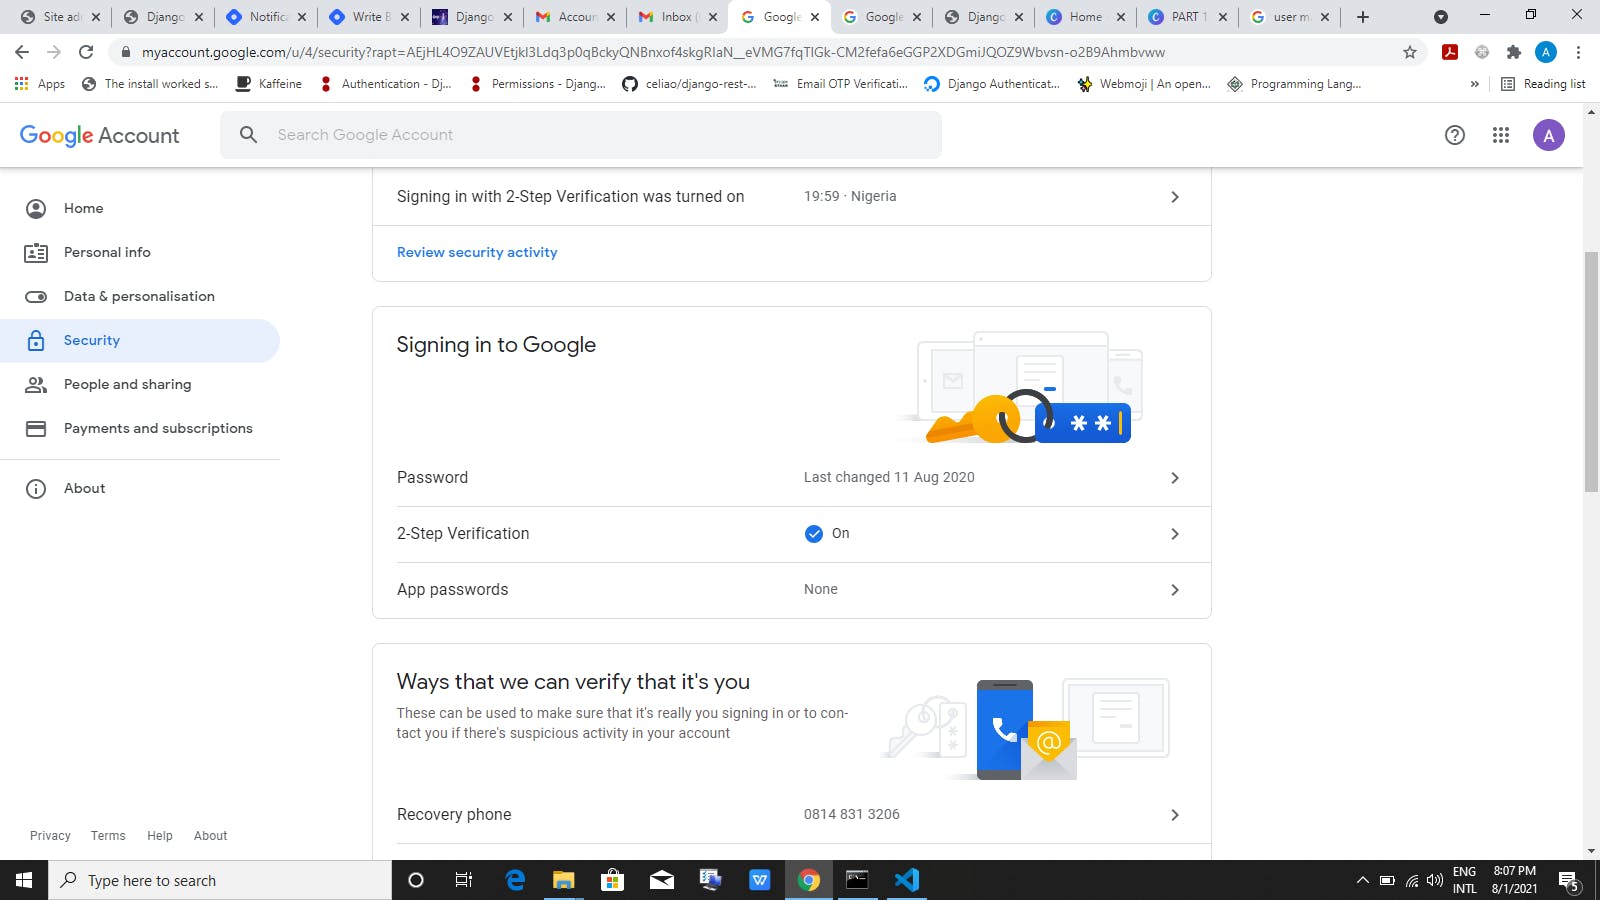
- Head over to your Gmail account, log in and click on manage your google account as shown below
- Then on the present screen, go to the security section and scroll down to the section "Signing in to Google" which should look like this

- Now switch on the two-factor authentication, if done successfully you should have an additional "App password" added to the "Signing in to Google" section as shown below
- Click on the "App password" and generate a new password which you will use as HOST_USER_PASSWORD in your settings.py file
Now we can send emails to the successfully registered users, and they have received the link for verification, let's update our controller to verify the user.
In the application urls.py file update the urlpatterns list with the code below
from .views import signup,activate_mail
path('activate/<uidb64>/<token>/', activate_mail, name = "activate"),
and also in our views.py file let's handle the real confirmation
from django.utils.http import urlsafe_base64_decode
from django.utils.encoding import force_text
def activate_mail(request, uidb64, token):
try:
uid = force_text(urlsafe_base64_decode(uidb64))
user = User.objects.get(id=uid)
if user is not None:
user.is_verified = True
user.save()
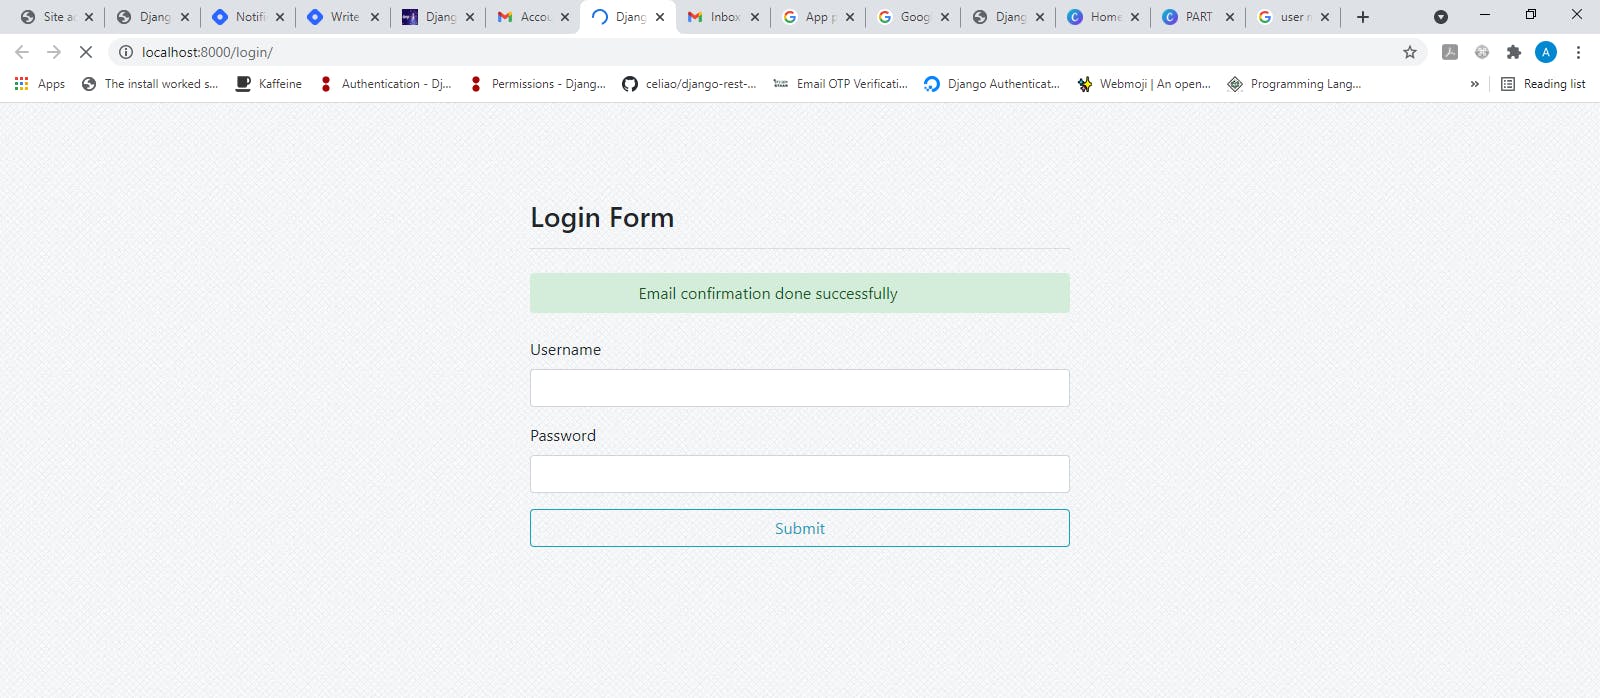
messages.success(request, 'Email confirmation done successfully')
return redirect('login')
except User.DoesNotExist:
messages.error(request,"Please sign up")
return redirect('signup')
So we decode the user's primary key that was encoded in the link sent as an email and then fetch the user associated with the primary key in which if found will have its is_verified field set to True else the user is redirected to the signup page to register.
Lastly, let's handle the login redirect by updating the application urls.py and views.py file with the lines below respectively
from .views import signup,activate_mail,Login, #Login is added here
path('login/', Login, name = 'login'),  #Add to the urlpatterns list
 def Login(request):
    return render(request, 'users/login.html')
And as you have guessed, we will now create login.html file in users folder in the templates folder of our project. Paste the code below in the login.html file
{% extends 'users/base.html' %}


{% block content %}

<div class="container">
    <div class="row mt-5">
        <form class="col-md-6 mx-auto mt-5" method="POST">
            {% csrf_token %}
            <h3>Login Form</h3>
            <hr>
            {% if messages %}
                {% for message in messages %}
                    <div class="alert-{{ message.tags }} rounded alert-dismissible text-center
         my-4 py-2" role="alert">


                    {{message}}

                    </div>
                {% endfor %}
            {% endif %}
            <div class="form-group">
                <label class="form-label">Username</label>
                <input type="text" class="form-control" name='username'>
            </div>


            <div class="form-group">
                <label class="form-label">Password</label>
                <input type="password" class="form-control" name='password'>
            </div>

            <button type="submit" class="btn btn-block btn-outline-info">Submit</button>


        </form>

    </div>
</div>

{% endblock %}
And that's it, our new users can now register and verify their email to be able to log in.
In part 2 we will handle user login, logout, and password change when logged in.
I hope you enjoy the article, Long you said right? Yeah long indeed.
Take care and stay save!!!