


Hello and welcome to the second part of this series, I hope you have implemented the user's registration with email confirmation discussed in part one, today we will implement the following
Authentication Vs Authorization
User Login and Logout
Password change while logged in
Authentication Vs Authorization
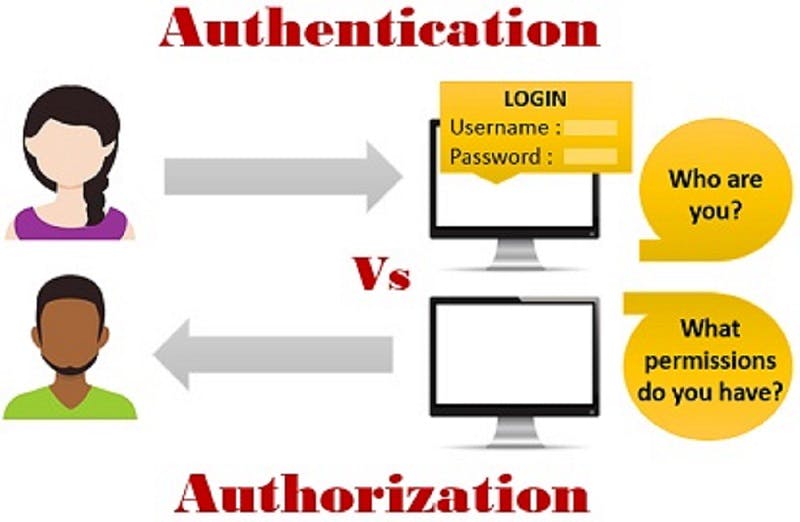
Recall we collected the user's information during the registration and now the user is back to claim that they have data with us and so we need to confirm that, This is where authentication comes in.
Authentication is to confirm that the user is who they claim to be by collecting some of the registered information and searching through the database if there is any user with such information.
Note: Information to be collected from the user has to be the ones unique to the user. information like email, username, and most importantly password.
If we successfully confirm the user, then we need to limit the user's free movement on what the user can do and can't do, This is where authorization comes in
Authorization is determining the permission the user has as a concern to whether they can perform or not.
E.g if we have a blog company with a series of writers but we want to limit some writers to not be able to edit the blog posts, though we have confirmed that the writer is who they claim to be but they won't be able to edit the posts as they don't have the permission to do that.
Login User
From part one of this series, we have extended the Django built-in User model which makes use of username and password fields to authenticate users. So we will be authenticating our users by collecting their usernames and passwords.
We can decide to ask our users to input email instead of username by adding the line below to our User model in our application's models.py file
email = models.EmailField(unique=True)REQUIRED_FIELDS = ['username','password'] #This is for admin users USERNAME_FIELD = 'email'
Django has its way of forcing us to do some stuff which I think is cool, So to change the username field to the email field we need to ensure that the email field is specified with a unique attribute and also remove it from the list of the required field. Also, the required fields specified are just for the fields to be requested when creating a superuser
We can log in users by
Using Django built-in login function Or
We create our login function
Using Django Login
Firstly we have to create the path in our app URL file as shown below
from django.contrib.auth import views as auth_views

#Add to the urlpatterns list
path('login/', auth_views.LoginView.as_view(template_name='users/login.html'),name = 'login'),
So we imported the auth module which has the class-based view LoginView as auth_views(this can be any name). Also, we have specified the HTML file to present to the user for the login as users/login.html. By default, if the HTML file is not specified, Django looks for the file in 'registration/login.html'.
Yes we have no view to write as you have guessed, what is just left is to update our login.html file with the line of code below
{% extends 'users/base.html' %}


{% block content %}

<div class="container">
    <div class="row mt-5">
        <form class="col-md-6 mx-auto mt-5" method="POST" action="{% url 'login' %}">
            {% csrf_token %}
            <h3>Login Form</h3>
            <hr>
            {% if messages %}
                {% for message in messages %}
                    <div class="alert-{{ message.tags }} rounded alert-dismissible text-center my-4 py-2" role="alert">

                    {{message}}

                    </div>
                {% endfor %}
            {% endif %}

            <div class="form-group">
                <label class="form-label">Username</label>
                <input type="text" class="form-control" name='username'>
            </div>

            <div class="form-group">
                <label class="form-label">Password</label>
                <input type="password" class="form-control" name='password'>
            </div>

            <button type="submit" class="btn btn-block btn-outline-info">Submit</button>

            <input type="hidden" name="next" value="{{ next }}">

            {% if user.is_authenticated %}
            <hr>
            <div class="row mx-1">
            <a class="btn btn-danger" href="#">Logout</a>
            <a class="btn btn-danger ml-auto" href="#">Change Password</a>
            </div>
            {% endif %}

        </form>

    </div>
</div>

{% endblock %}
Going through the login.html file, we have included the section enclosed in {% if the user.is_authenticated %} .... {% endif %} to only show the two buttons there if the user is successfully authenticated i.e. logged in.
But wait, we still need to update our settings.py file with
LOGIN_URL = '/login/'
LOGIN_REDIRECT_URL = '/login/'
So the use of the LOGIN_URL is to tell Django our login path when it's time to redirect users who are not logged in to the login page. As for the LOGIN_REDIRECT_URL, it is useful for redirecting the user on successful login.
Custom Login
If you recall, we have extended our User model with the is_verified field which made us send an email for confirmation and so we have decided that users who do not confirm their email will not be allowed to log in but we can not do that with the Django built-in Login and so let's redefine the login view.
In the application urls.py file add an update with the lines below
from .views import Login,

#Add to urlpatterns list
path('login_user/', Login, name = 'login'),
In the views.py file add the lines below
from django.contrib.auth import  authenticate,login
from .forms import LoginForm

def Login(request):

    if request.method == 'POST':
        form = LoginForm(request.POST)
        if form.is_valid():
            user = authenticate(request, username=form.cleaned_data.get('username'), password=form.cleaned_data.get('password'))
            if user is not None:
                if user.is_verified:
                    login(request,user)
                    messages.success(request, 'Login successfully done')
                    return redirect('login')
                else:
                    messages.error(request, 'Please confirm your email')
                    return redirect('login')
            else:
                messages.error(request, "Invalid credentials provided")
                return redirect('login')
    return render(request, 'users/login.html')
So the Login view collects the user's username and password, uses the imported authentication package to confirm the user's submitted credentials in the database, and if a matched user is found it checks if such user has its is_verifed field as True, it now logs in the user using the login package. Also if any of the if conditions is False we have taken care of what to show and where to redirect the user as shown in the code.
And we should not forget to add the LoginForm we used in the Login view above by updating the forms.py file in our application
class LoginForm(forms.Form):
    username = forms.CharField(max_length=200)
    password = forms.CharField(max_length=200)
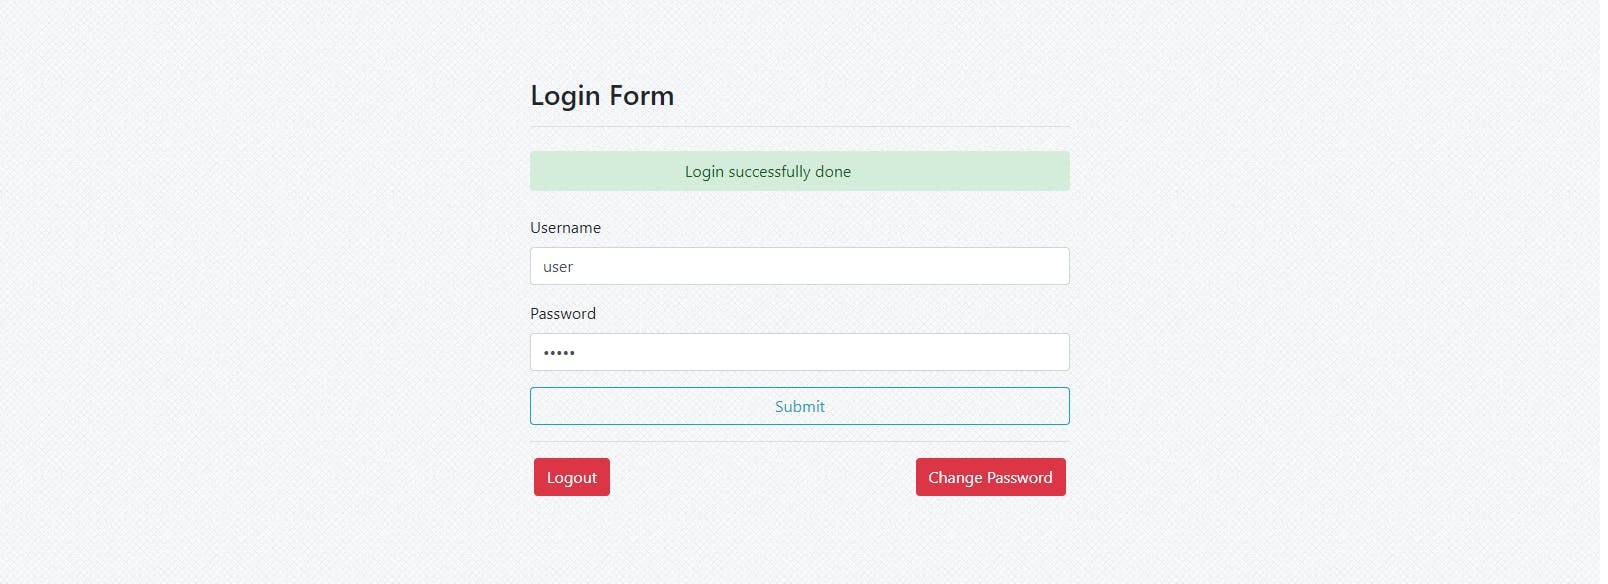
So users with correct login credentials and is_verified True will see the response as shown below
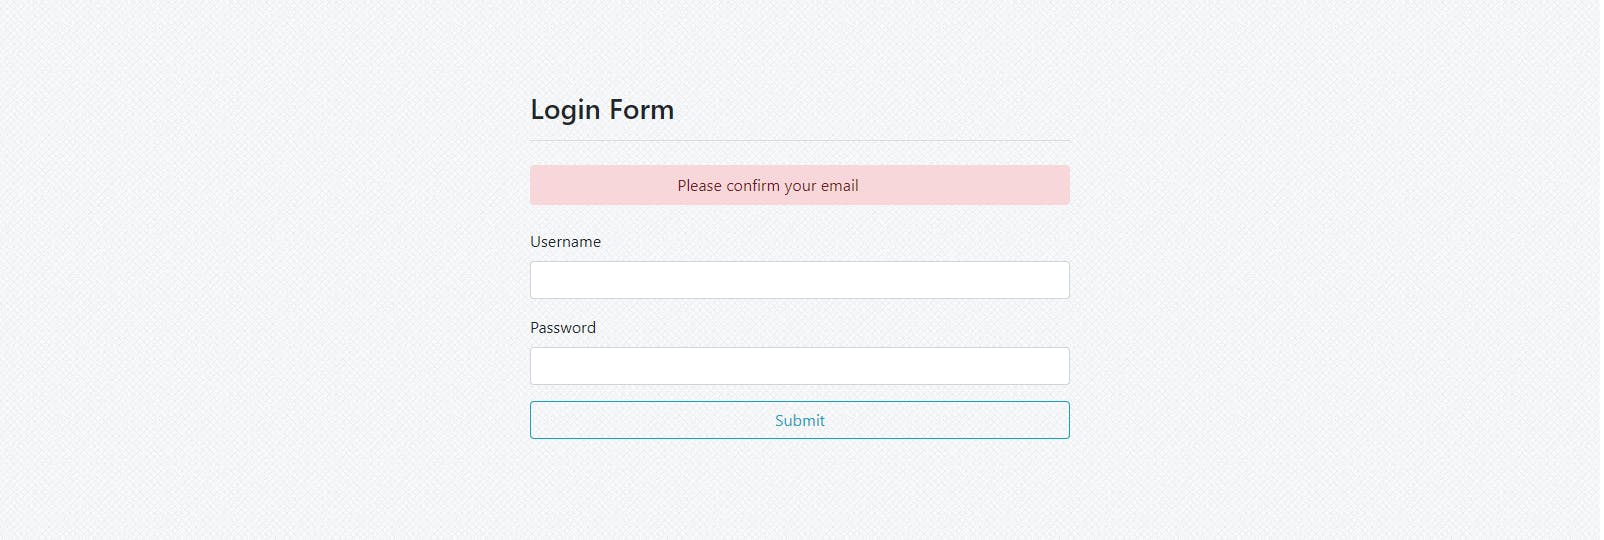
Users with correct credentials but is_verified False will see the response
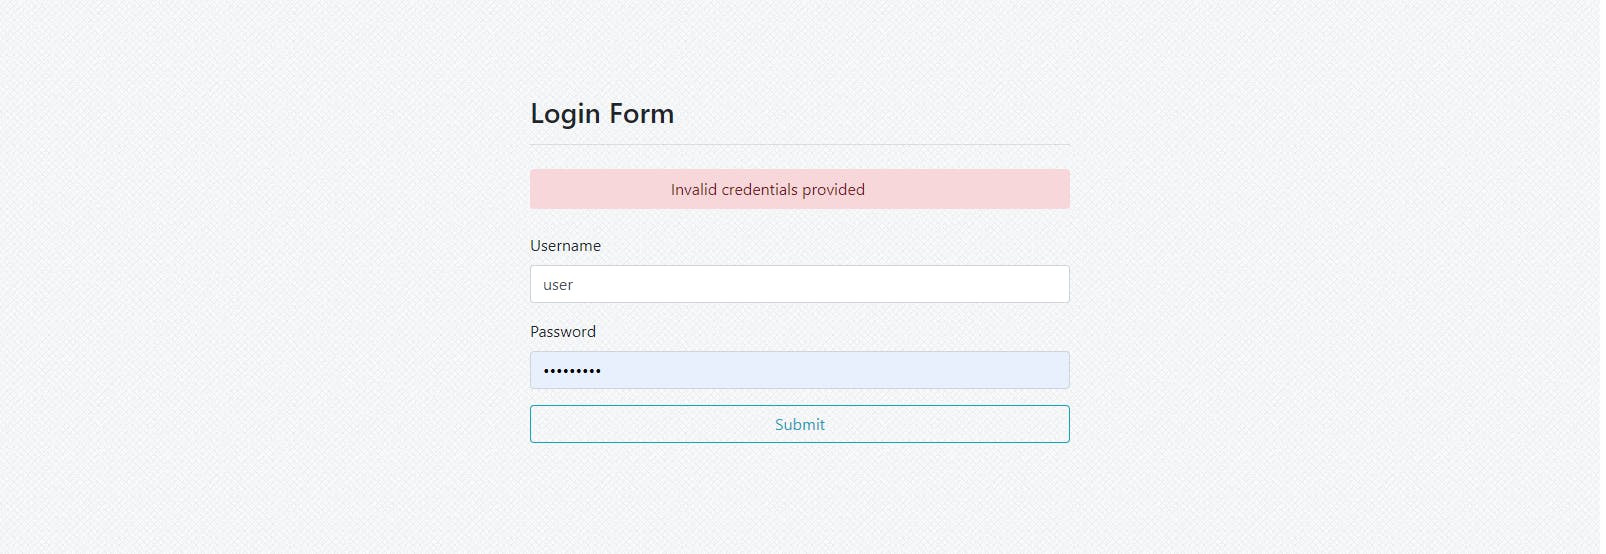
Users with the wrong credentials will have the response below
Logout User
So our successful login page has shown a logout button but does nothing, Now let's attach the link below to it
<!-- Replace the logout button with the below-->
<a class="btn btn-danger" href="{% url 'logout' %}">Logout</a>
So like login, Django has a logout view which we will use by adding the line below to the application urls.py file
#Add to the urlpatterns list
path('logout/', auth_views.LogoutView.as_view(), name='logout'),
what the above does is to clear any session created associated with the user sending the request and thus we need to tell Django where to take us after successful logout by adding the line below to our settings.py file
LOGOUT_REDIRECT_URL = '/login/'
And that's it, Our users can now log in and log out as they wish......
Password Change
After successful login, you see that we have made the logout and change password button visible to the users. Now let's take care of the change password section by following the steps below
- Replace the change password button in login.html with the below
<a class="btn btn-danger ml-auto" href="{% url 'change-password' %}">Change Password</a>
- Add the URL path in the application urls.py file
from .views import change_password

#Add to the urlpatterns list
path('change-password/', change_password, name = 'change-password'),
- Create the change_password view in the views.py file
from django.contrib.auth.decorators import login_required
from .forms import PasswordChangeForm
from django.contrib.auth import update_session_auth_hash

@login_required()
def change_password(request):
    if request.method == 'POST':
        form = PasswordChangeForm(request.POST)
        if form.is_valid():
            user = request.user
            user.set_password(form.cleaned_data.get('new_password'))
            user.save()
            #keep user logged in
            update_session_auth_hash(request, user)
            messages.success(request, 'Password changed successfully')
            return redirect('login')
        else:
            return render(request, 'users/password_changed.html', {'form':form})

    return render(request, 'users/password_changed.html')
We have used the login_required decorator to ensure that this view can only be accessed by users who are logged in i.e. have been authenticated, where we use request.user is to get the current logged-in user credentials to locate such user in the database and also the update_session_auth_hash to update the session info about the logged-in user and thus keep the user logged in the user will be redirected to the login page for a new login which we do not want.
- Now let's update our forms.py file which is to include the PasswordChangeForm class
class PasswordChangeForm(forms.Form):
    new_password = forms.CharField(max_length = 30)

    def clean_new_password(self):
        new_password = self.cleaned_data.get('new_password')

        #check password length
        if len(new_password) < 8:
            raise ValidationError("Password can't be less than 8 characters")
        #check for number and letters is password
        if new_password.isalpha() or new_password.isnumeric():
            raise ValidationError("Password should contains both letters and numbers")

        return new_password
Here we created an input new_password field which we have cleaned i.e. validated with the clean_new_password method which is called when the form.save() is called.
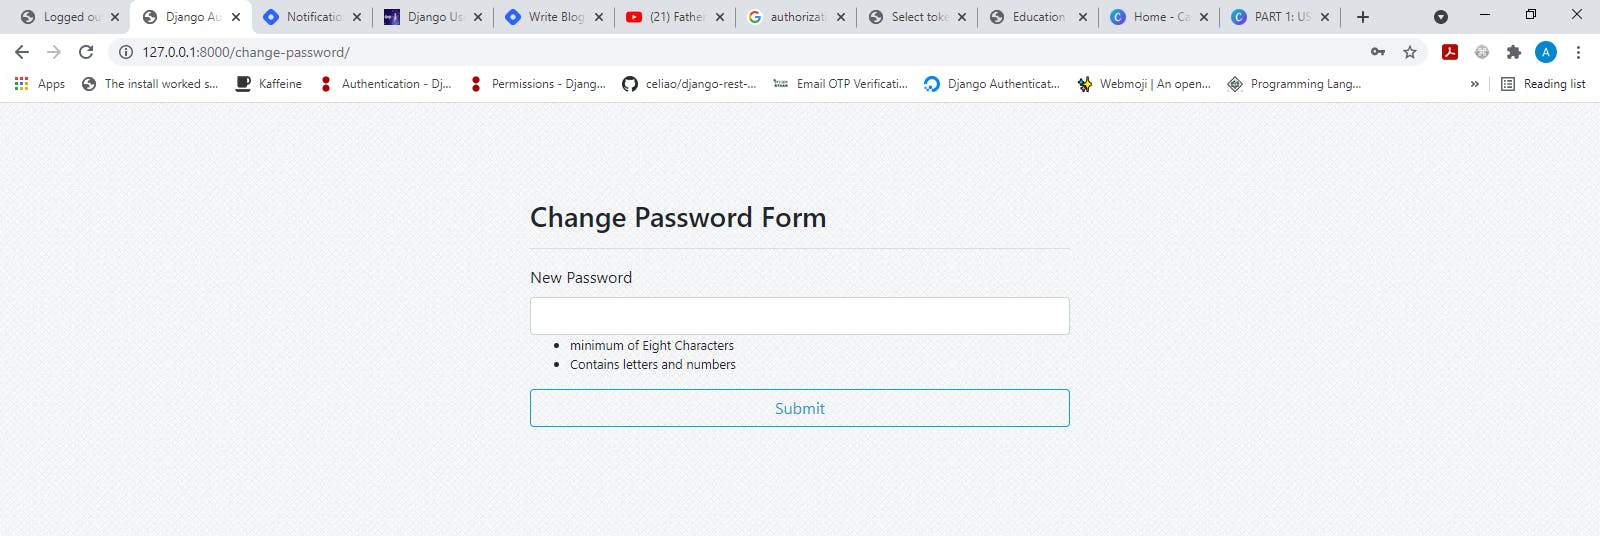
- Lastly, let's create the password_changed.html page to present to the user to input their new password. Create password_changed.html in the users folder which is in the application templates folder and paste the lines below
{% extends 'users/base.html' %}


{% block content %}

<div class="container">
    <div class="row mt-5">
        <form class="col-md-6 mx-auto mt-5" method="POST">
            {% csrf_token %}
            <h3>Change Password Form</h3>
            <hr>
            {% if messages %}
                {% for message in messages %}
                    <div class="alert-{{ message.tags }} rounded alert-dismissible text-center my-4 py-2" role="alert">


                    {{message}}

                    </div>
                {% endfor %}
            {% endif %}

            {% for error in form.errors %}
            <div class="alert-danger alert-dismissible rounded text-center my-4 py-2" role="alert">

                {% if error == 'new_password' %}
                    {{form.new_password.errors.0}}
                {% endif %}

            </div>
            {% endfor %}
            <div class="form-group">
                <label class="form-label">New Password</label>
                <input type="password" class="form-control" name='new_password'>
                <small>
                    <ul>
                        <li>minimum of Eight Characters</li>
                        <li>Contains letters and numbers</li>
                    </ul>
                </small>
            </div>

            <button type="submit" class="btn btn-block btn-outline-info">Submit</button>

        </form>

    </div>
</div>

{% endblock %}
And that's it our user can change their password when logged in

And that's it for this article, We will look into password reset when not logged in in the last part of the series.
Take care and stay safe !!!